Vostok 2428 Caliber Service Guide a Rare Chistopol Double Calendar

The Vostok 2428: A Rare Chistopol Double Calendar Caliber and Its Remarkable Balance

The Vostok 2428: A Rare Chistopol Double Calendar Caliber and Its Remarkable Balance

The Vostok 2428: A Rare Chistopol Double Calendar and a Balance Worth the Wait

"Some movements you service for the work. Others you open just to see how good a Soviet factory could be when it still wanted to prove something."
— Igor

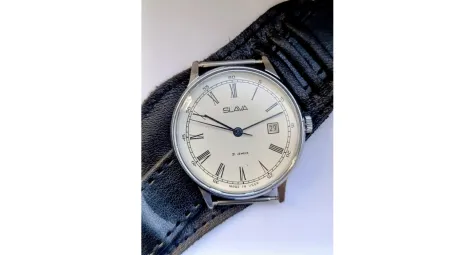
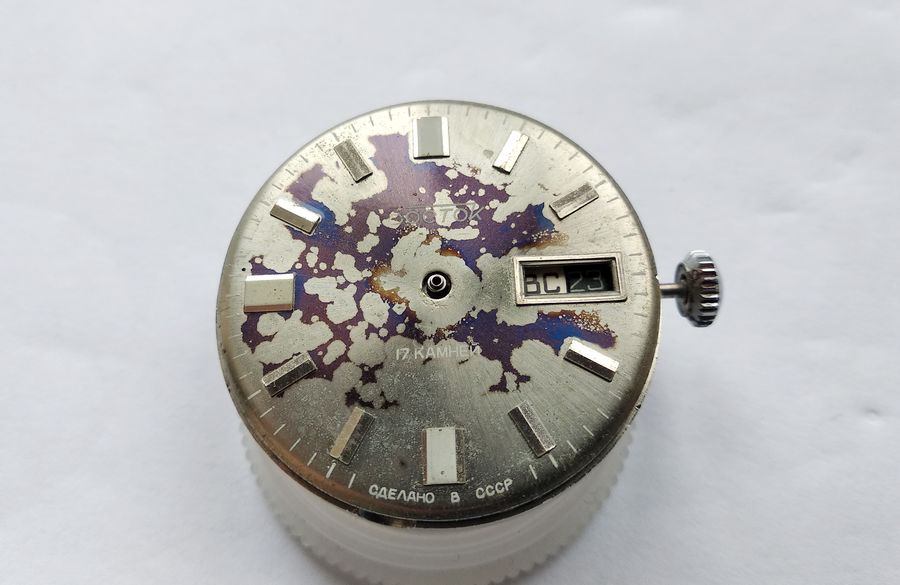
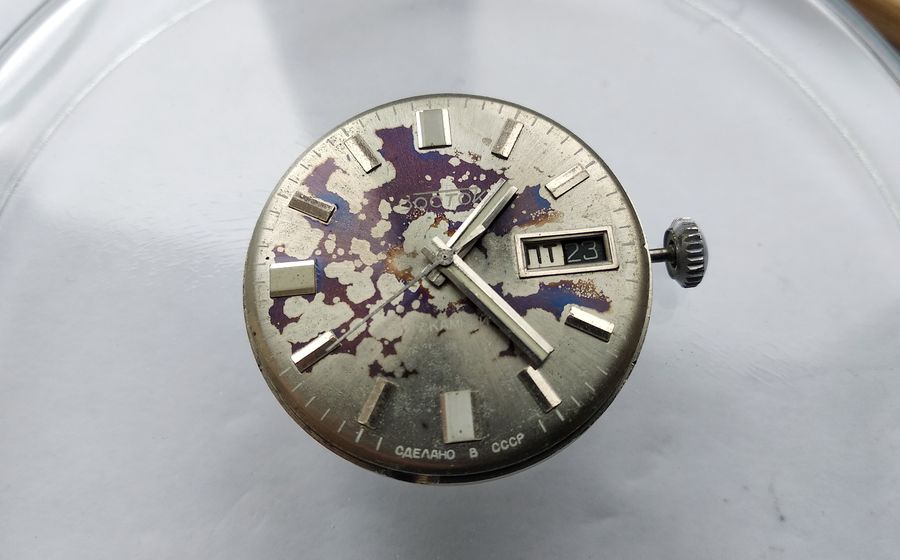
Of all the calibers to carry the Vostok name, the 2428 is among the least often seen. It is a manually wound movement with a double calendar — day of the week and date, both switching instantaneously — built at the Chistopol Watch Factory in the early years of its production, before the brand settled into the simpler, mass-market designs that would define it. I had honestly never had one open on the bench before. At first glance it resembles the familiar 2414, and it does share the family resemblance, but it is a different and far more ambitious thing. There is even a small joke buried in the name: Orient, the Japanese house famous for its full-calendar watches, translates into Russian as Vostok — "East." So in a sense Japan, too, builds Vostok watches with a complete calendar. This one came from Chistopol.

Front of a Vostok watch with a heavily stained silver dial, applied markers, and a day-and-date window at three o'clock
The patient as received. The dial has discolored into something resembling a map of an imaginary continent, but the applied minute markers and the logos have survived clearly, and the day-date aperture sits at three. Made in the USSR, as the foot of the dial confirms.

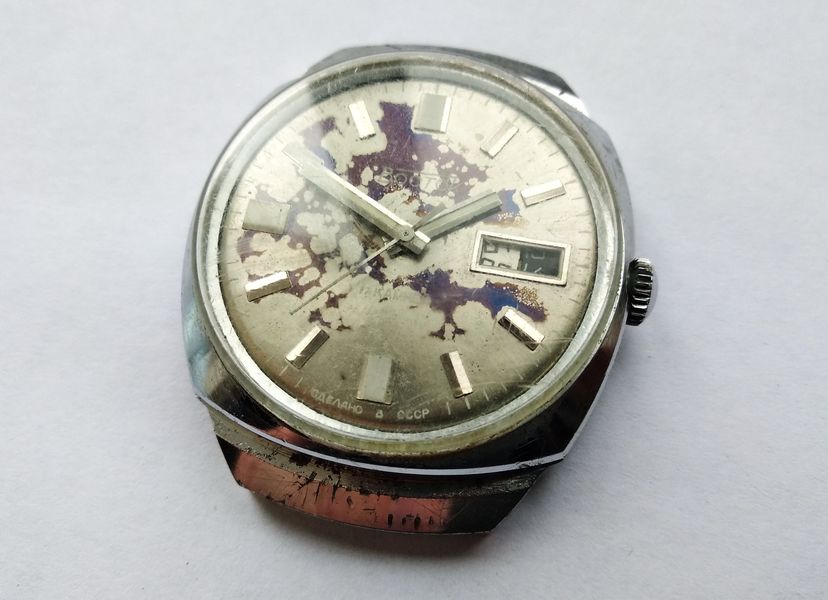
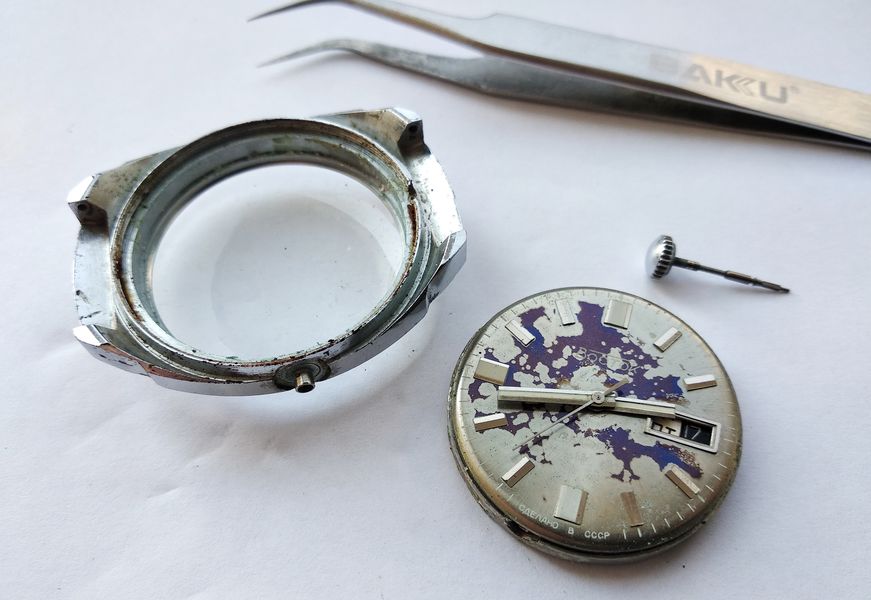
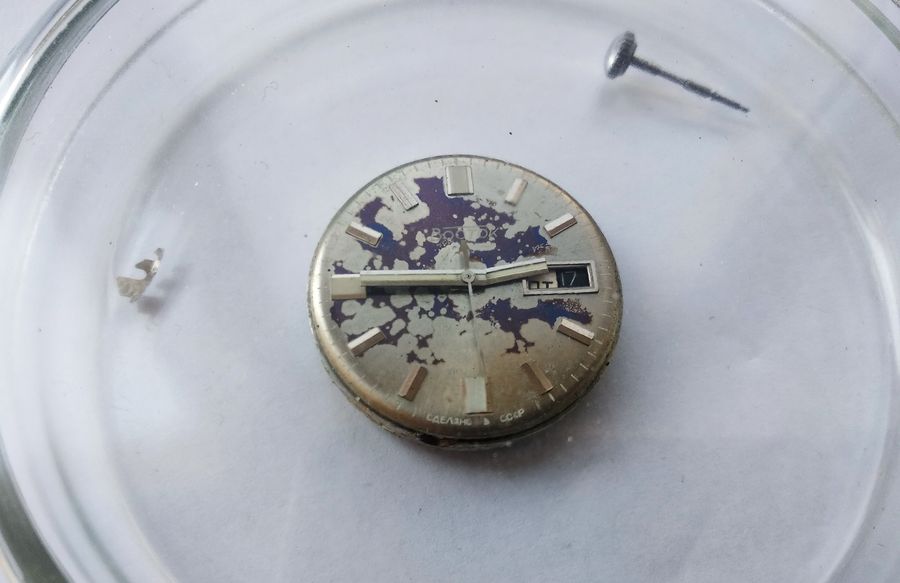
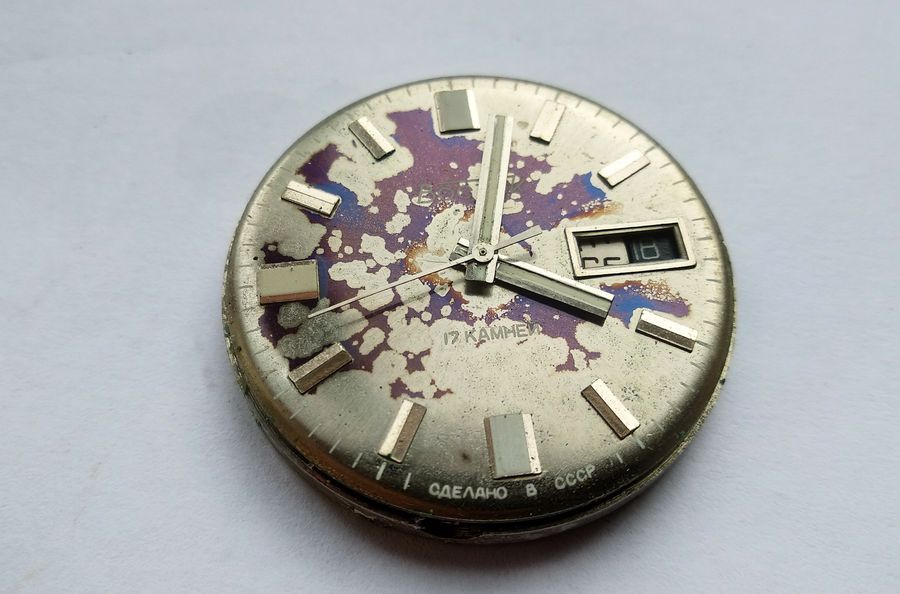
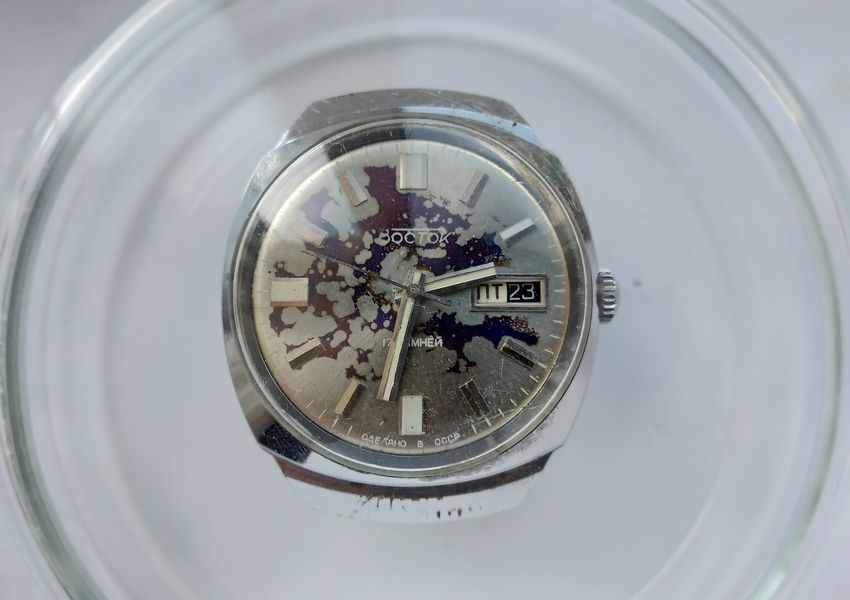
There is nothing to be done about a dial like this short of replacing it, and no replacement exists, so it will serve a collector's example as it is. A brush to lift the dust of decades, and we leave it. The mechanical story is the one worth telling here, and it begins, as always, with getting inside.

Opening a Reluctant Case

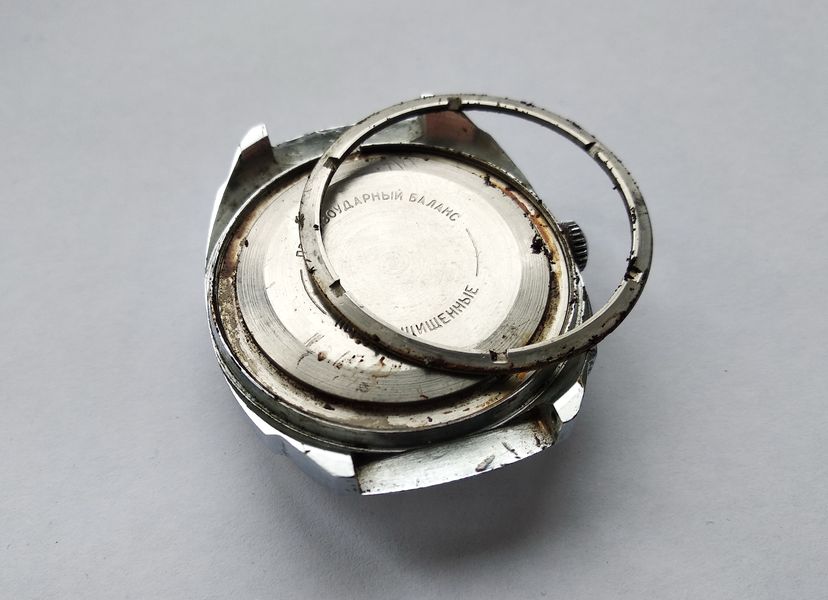
The back is closed by a case-back screwed down hard against a figured ring nut. A case wrench, a little more pressure… no — not that much. The back would not budge. So we fall back on a tried method: a touch of WD-40 into the seams, carefully kept out of the movement, and off to drink coffee while it works.

The watch case back retained by a figured screw-down ring, with penetrating fluid applied to the seam
The screw-down back, locked by a figured ring nut. Years of grime had effectively seized the thread, so a drop of penetrating fluid went into the seams while the coffee brewed.

Fifteen minutes later the magic had worked, and the seized ring gave way without undue force. There was certainly enough dirt under it to lock a thread solid, but WD-40 has dealt with worse.

The loosened retaining ring lifted from the case revealing accumulated dirt in the thread
The ring freed at last. The amount of compacted dirt in the thread explains the resistance — exactly the sort of thing that welds a screw-back shut over the decades.

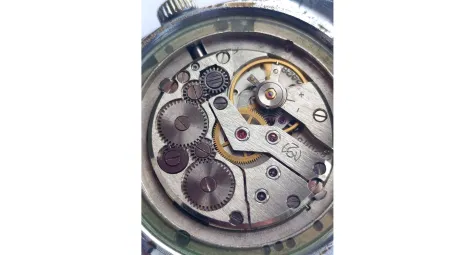
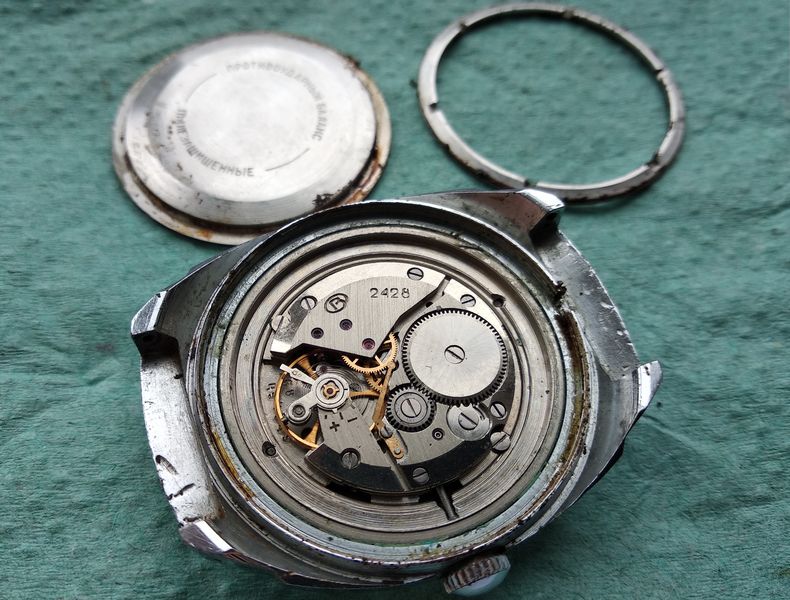
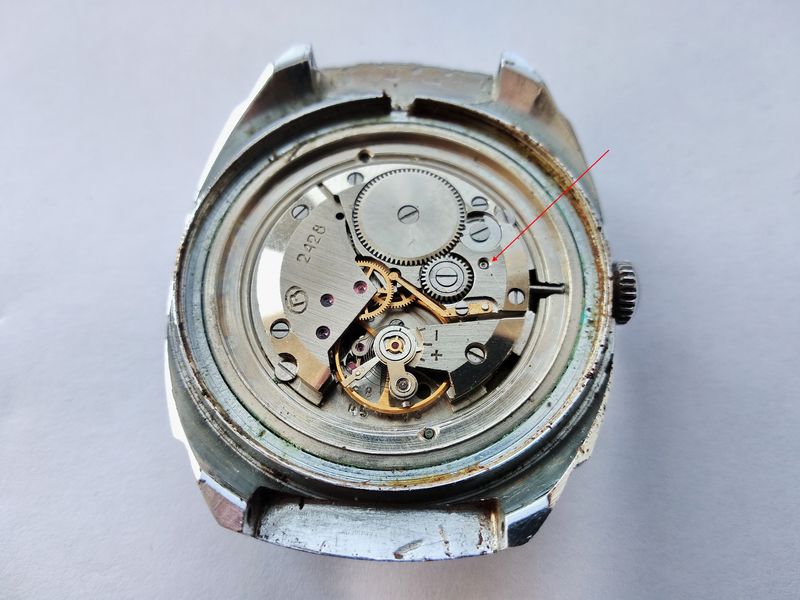
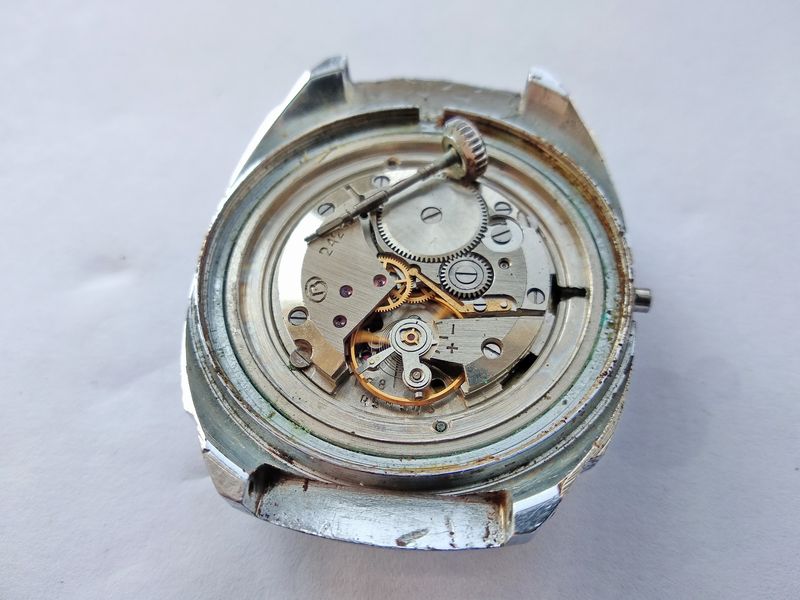
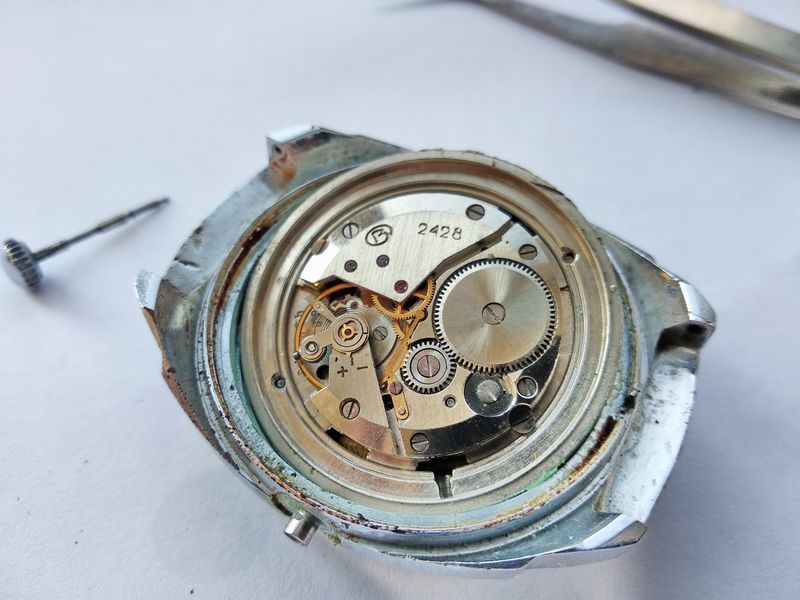
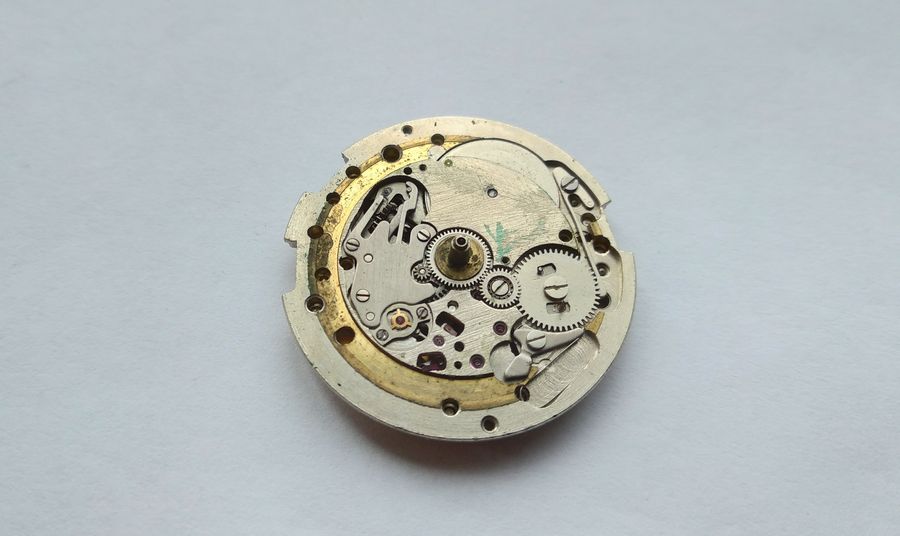
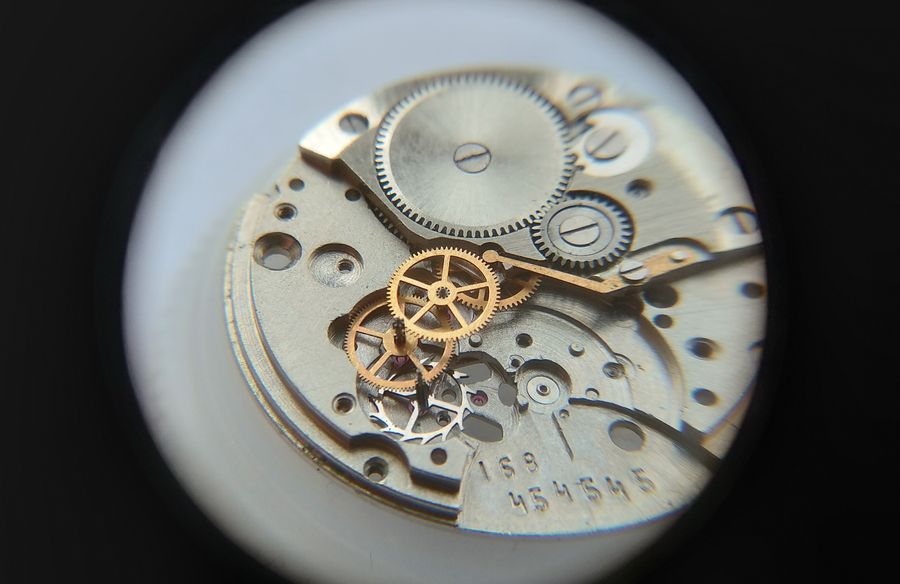
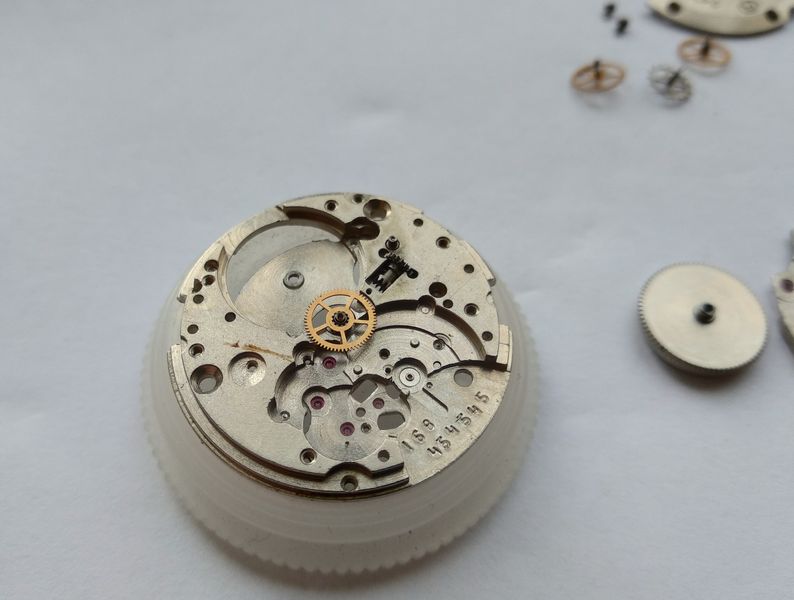
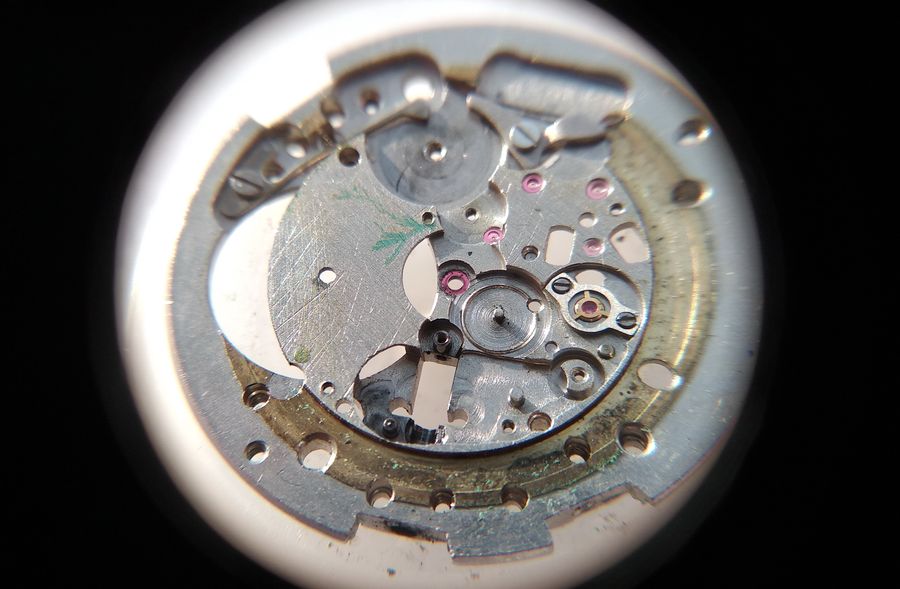
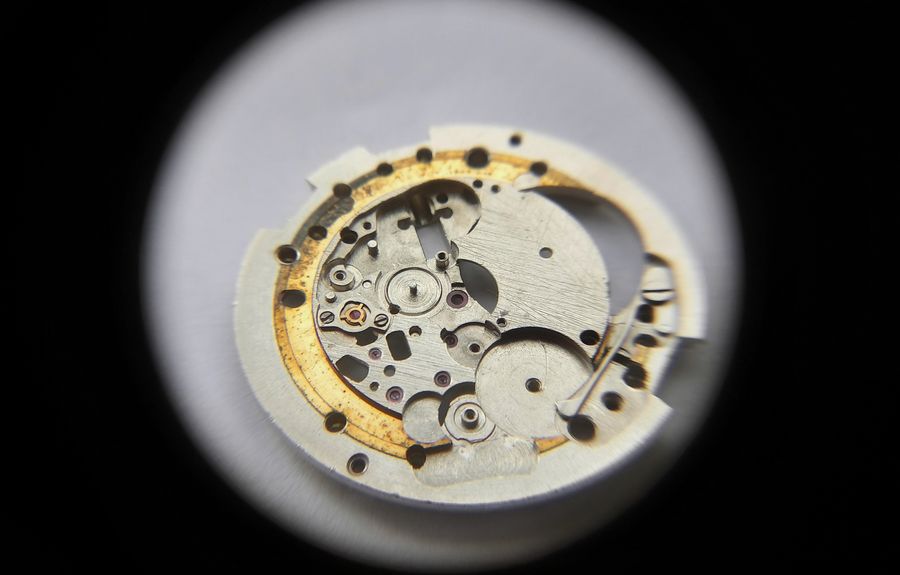
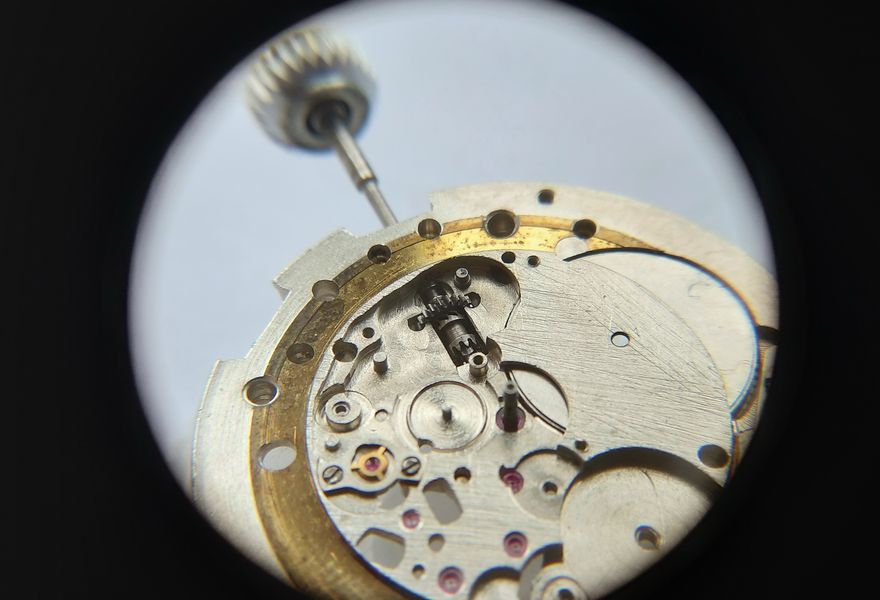
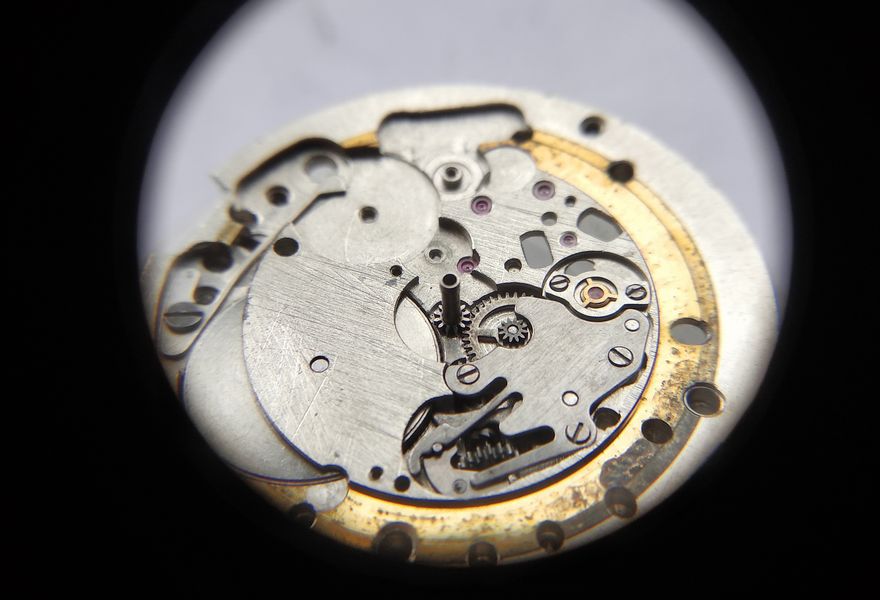
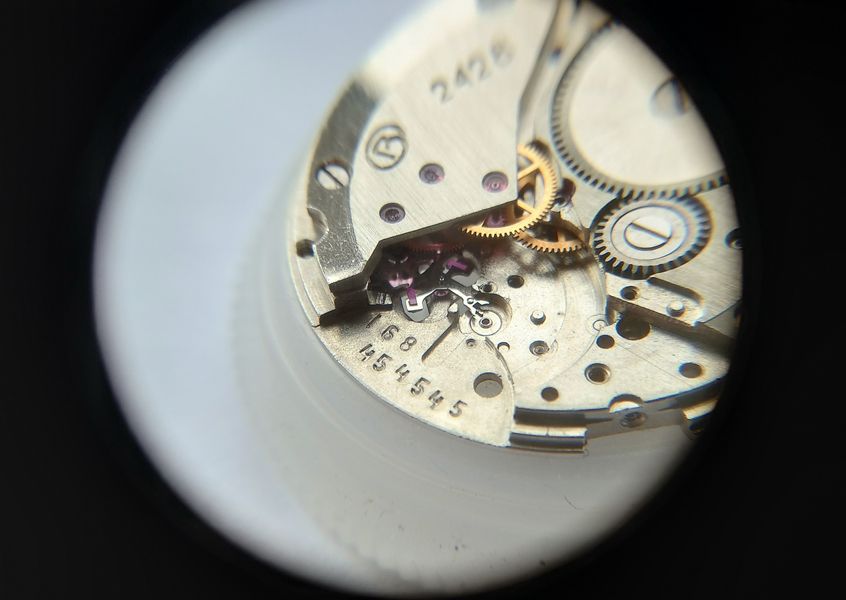
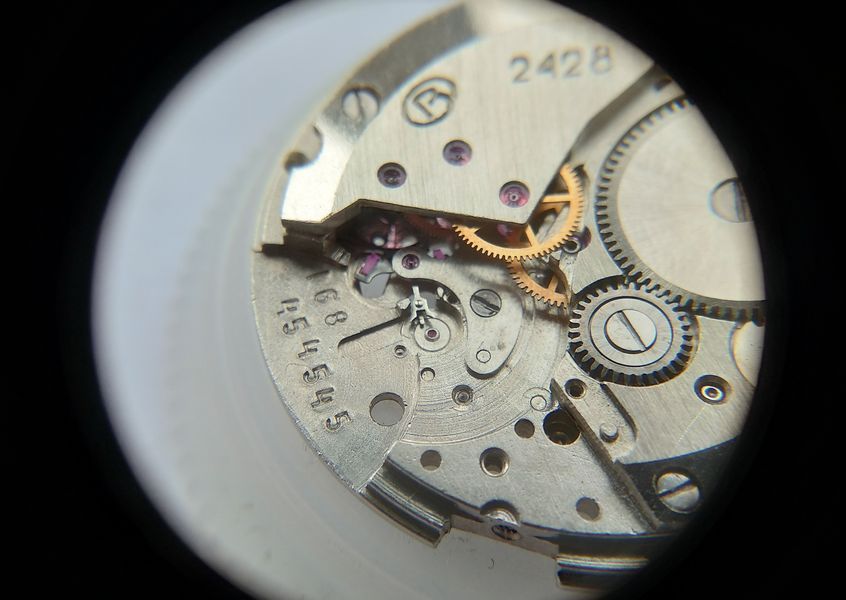
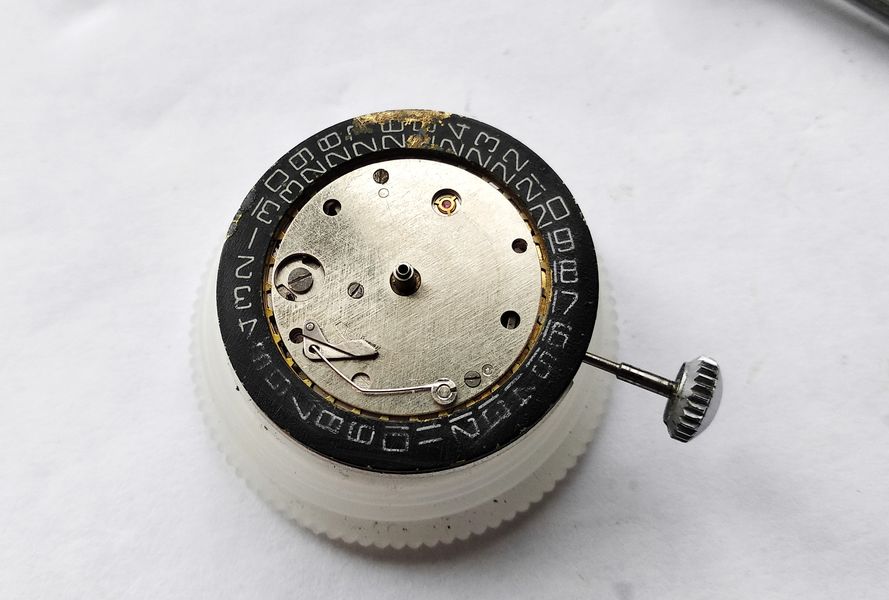
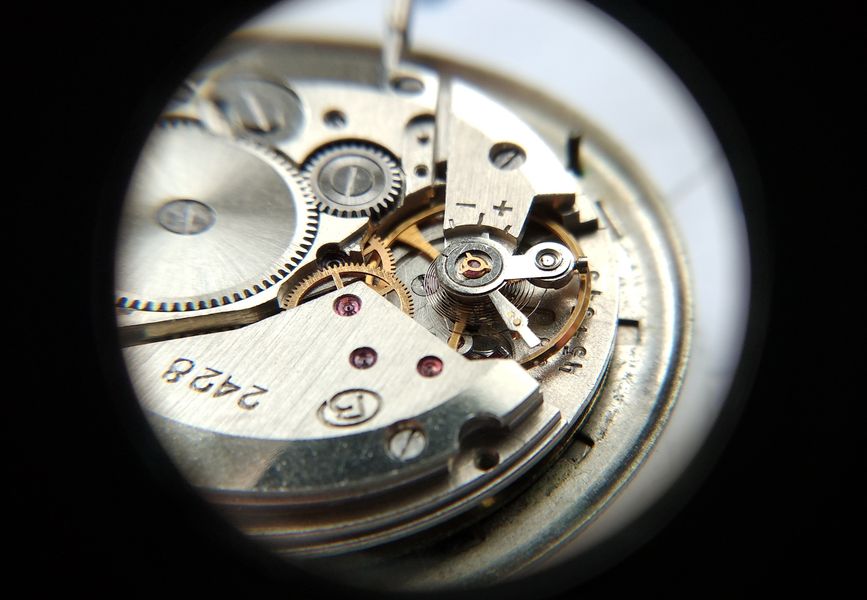
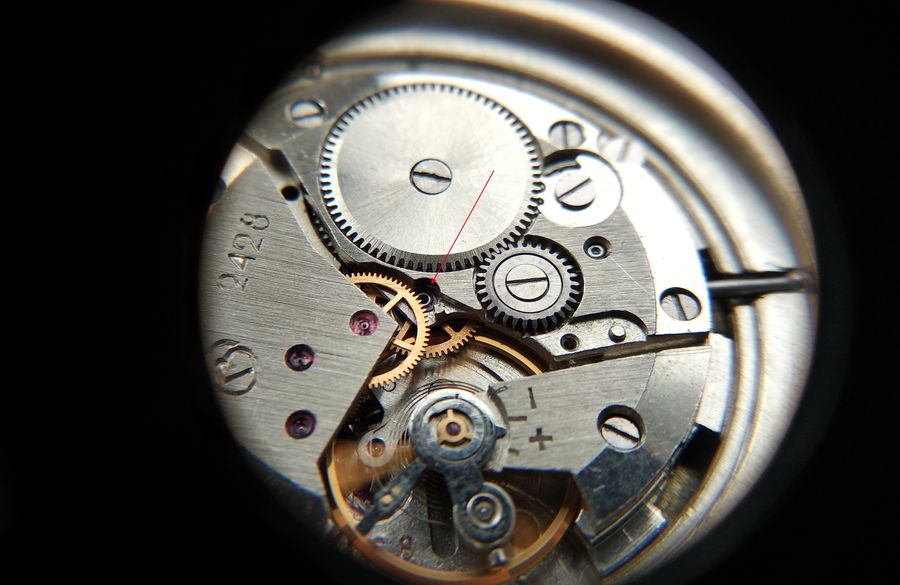
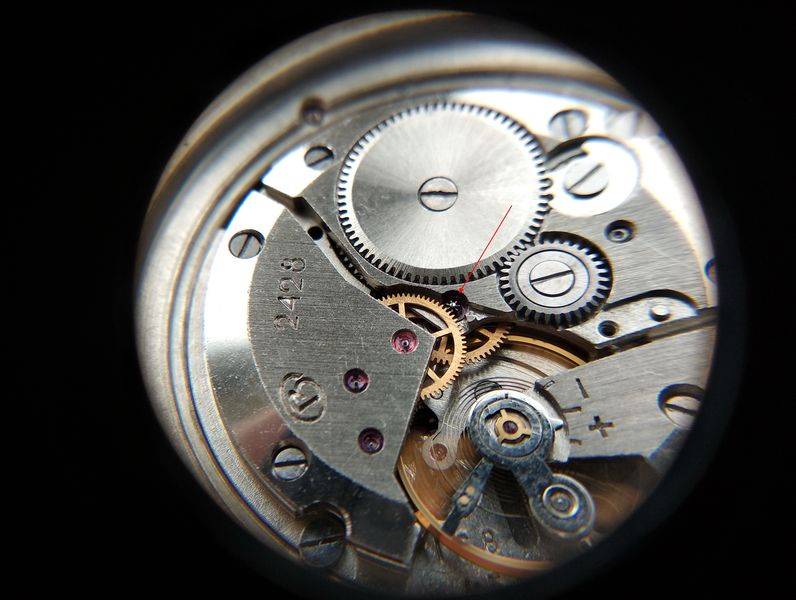
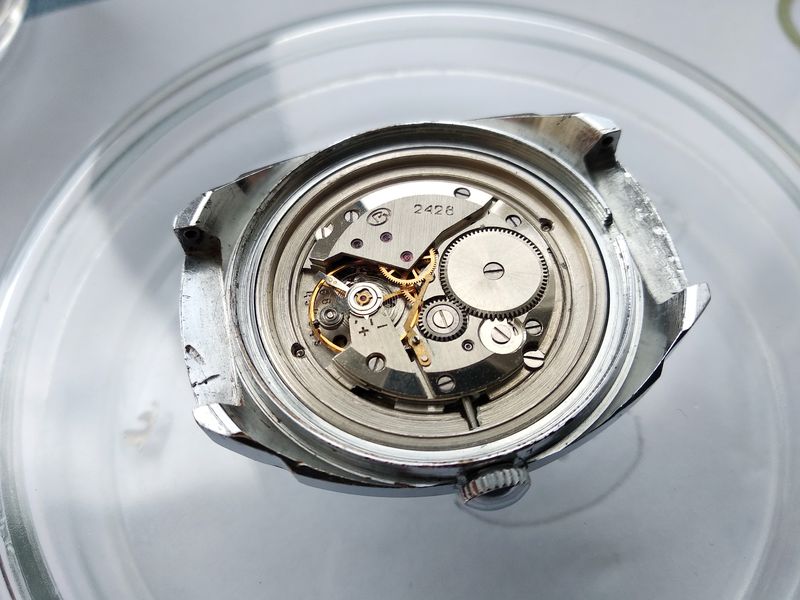
And now we are in the engine room, so to speak, face to face with the Vostok caliber 2428. Few people have seen it; I am looking at one for the first time myself. The fingers are already itching to take it apart — but all in good time, especially in work as painstaking as watch repair. And never mind that it resembles a 2414 at first glance: similar, yes, but by no means the same thing.

The Vostok 2428 movement exposed inside the open case
First sight of the caliber 2428. Superficially it echoes the common 2414, but the architecture underneath the bridges tells a different story.

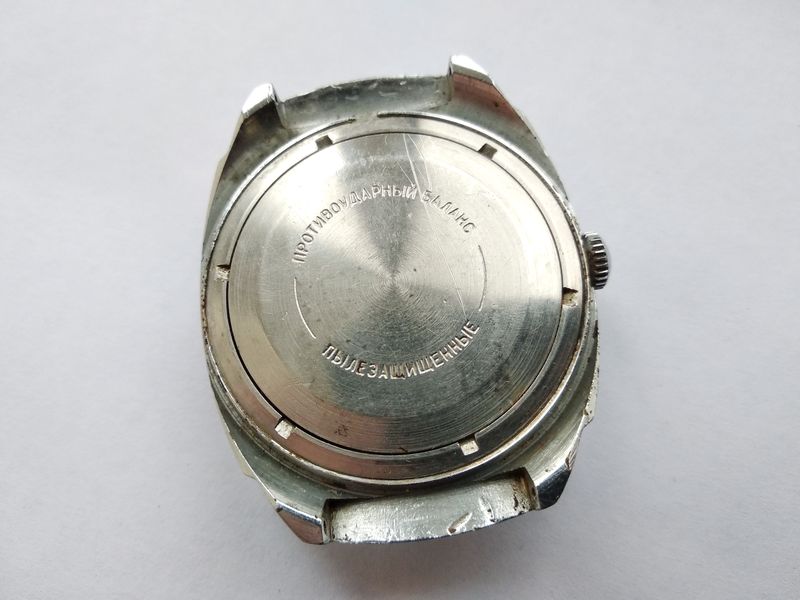
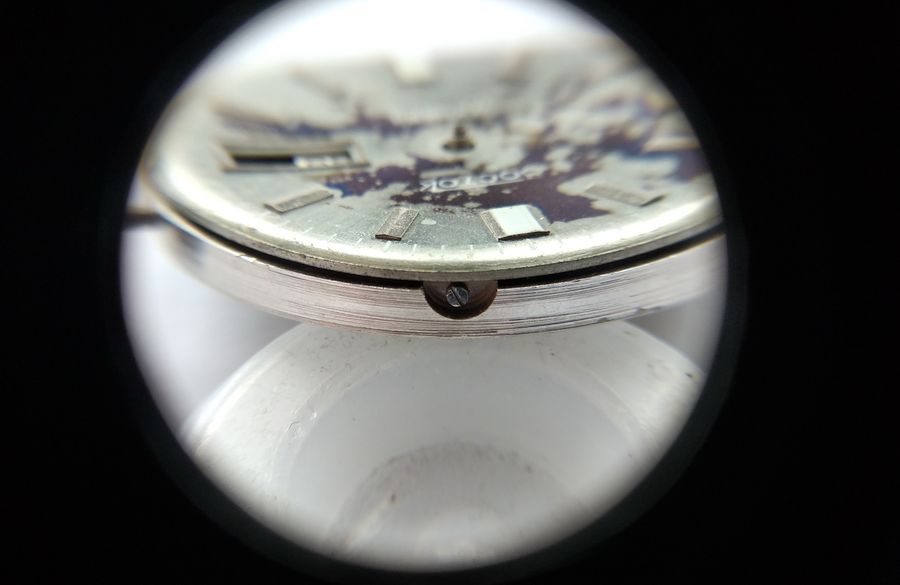
Let us first consider the case. The back is made to a high standard and has real heft, in every sense. Its engraving tells us that the balance is shock-protected — and oh, we shall have plenty to say about that balance — and that the case is dust-protected. I will add that it is protected rather well.

The exterior of the heavy screw-down case back with engraved markings
The case back, solid and well made. Its engraving advertises a shock-protected balance and a dust-protected case — both claims the watch lives up to.

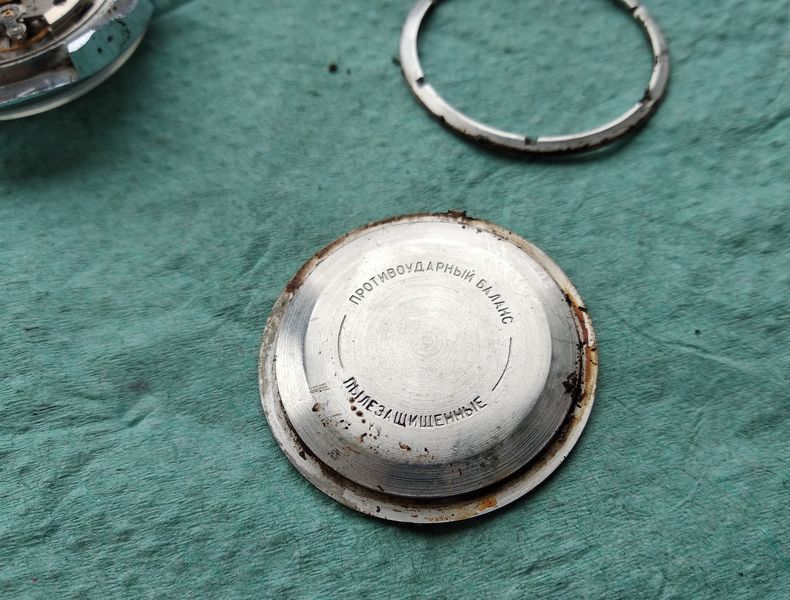
Turn the back over. The gasket is there — a little hardened, but it will go into silicone to soften for a couple of days while we work. And there is one more telling detail: the autograph of the watchmaker who last serviced these.

The inside of the case back showing a hardened gasket and an engraved repairer's signature
Inside the back, the stiffened seal and — a nice touch — the scratched signature of the last repairer to open the watch.

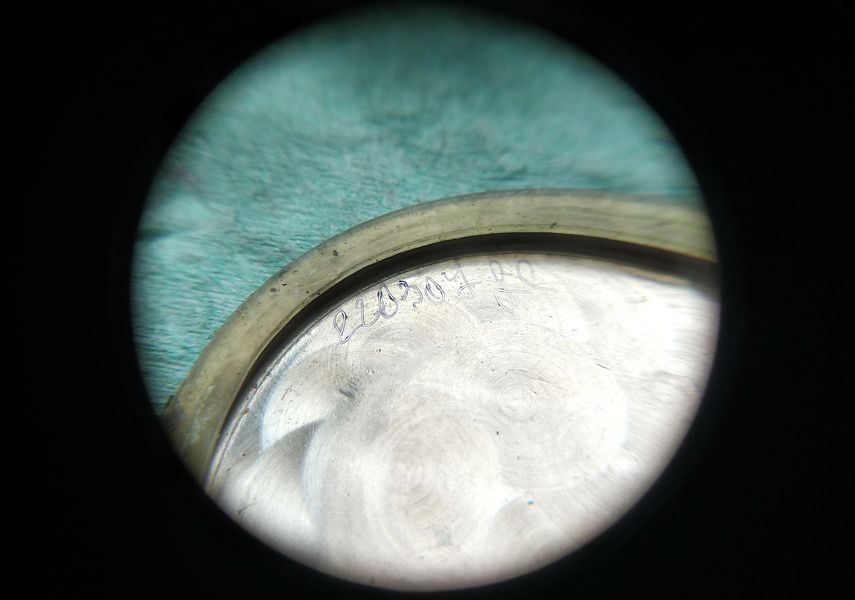
Here is the inscription: 22.03.2007. Fourteen years ago, at the time of the original work. And before that? This model was clearly made before 1980; there is no SU mark on the bridge, which points to manufacture somewhere around the late 1960s or early 1970s — well over half a century of service now.

Close-up of the repairer's engraved service date inside the case back
The service date, 22.03.2007. Together with the absence of an SU stamp on the bridges, it places the watch at the turn of the 1960s into the 1970s.

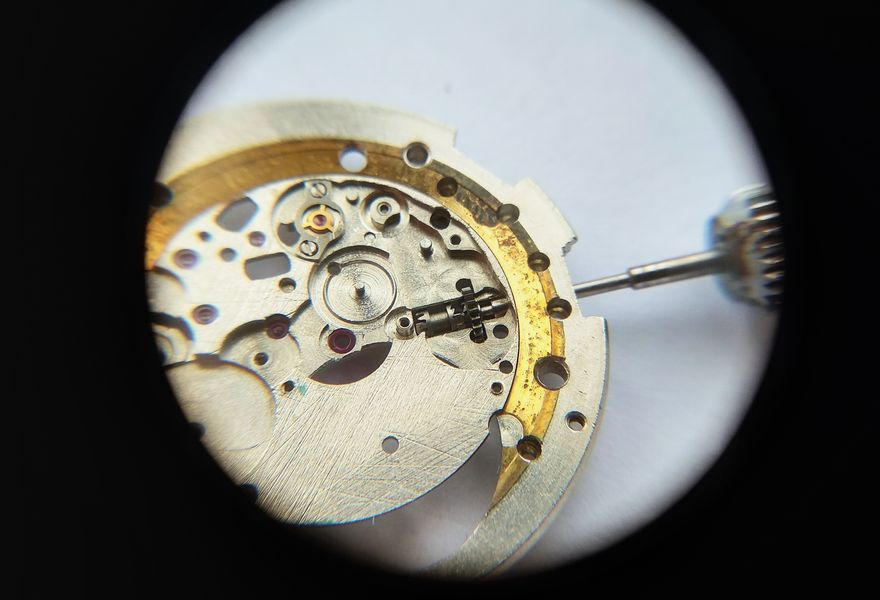
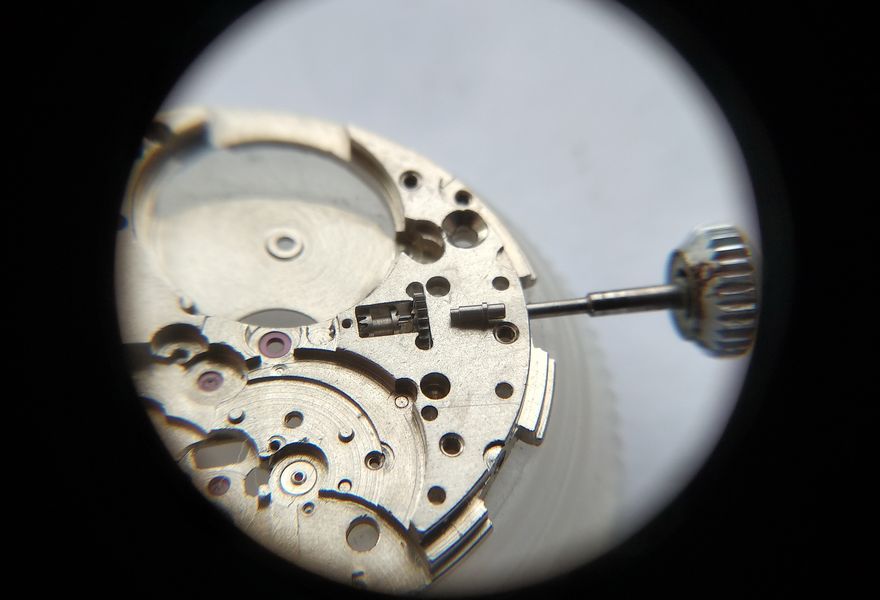
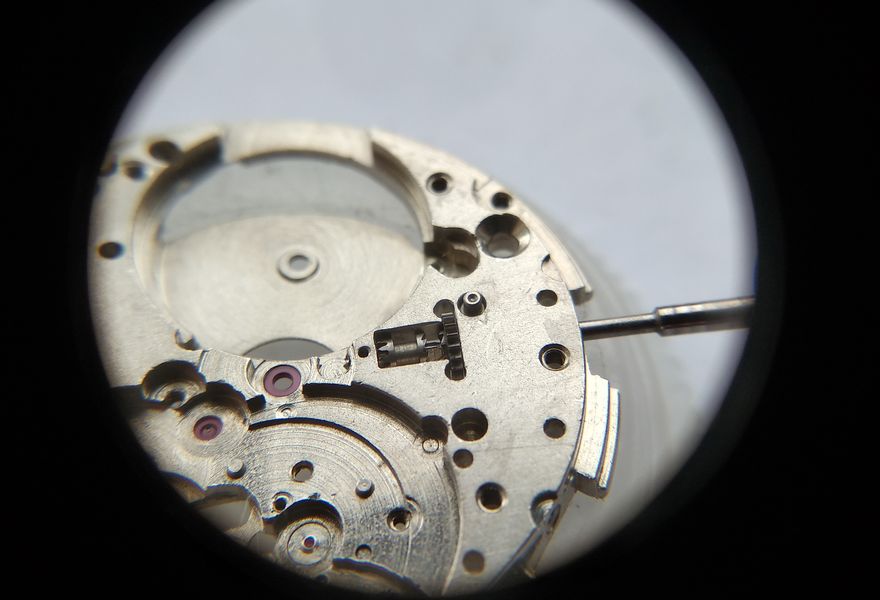
To free the movement we do what is familiar: press the release button that uncouples the keyless works' intermediate lever from the winding stem, and withdraw the stem.

Pressing the stem-release button to withdraw the winding stem from the movement
The winding stem is released in the usual way, by pressing the detent that frees it from the intermediate setting lever.

These are among the first runs of the Vostok 24xx movements, and they are made well. The stem leaves its tunnel cleanly, sliding out without the slightest trouble.

The winding stem withdrawn fully from the movement
The stem slips out effortlessly — the build quality of the early 24xx series showing in something as small as a clean-running tunnel.

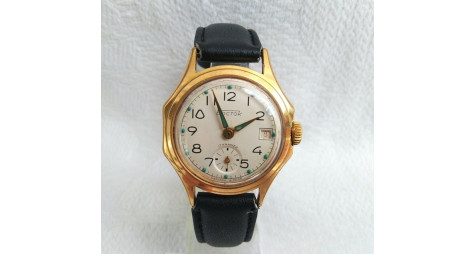
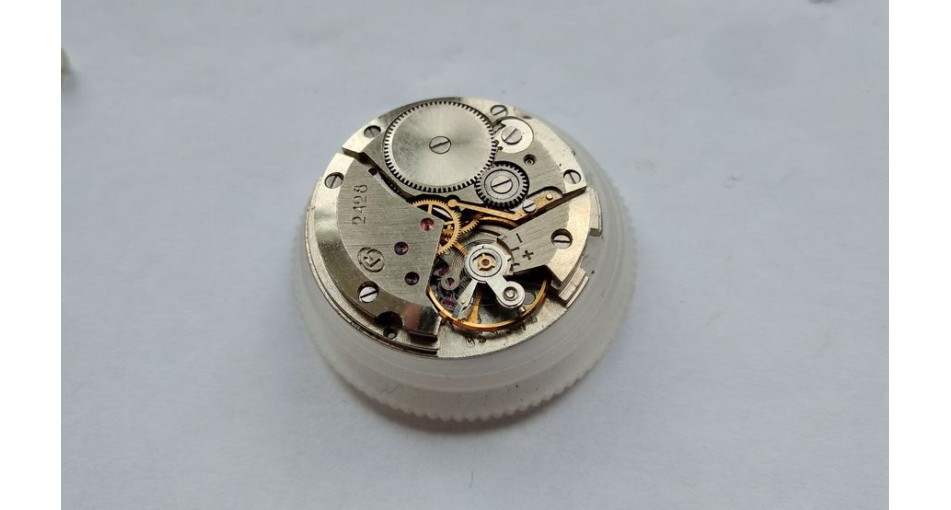
Now we simply invert the watch, give it a slight shake, and the movement drops free of the case. Note this carefully: the caliber is mounted in an additional ring, and the dial is fixed to that same ring. You see much the same in the Slava watches on the Slava 2428 caliber — but the Vostok has no quick-set date mechanism, so here the ring is just a ring, without the extra works the Slava carries inside it. Even so, without that ring there would be no way to assemble a full calendar. A small paradox results: the caliber itself is 24 mm across, hence 24xx, but fitted with a double calendar it must sit in a ring 32 mm in diameter. The ring becomes, in effect, an obligatory part of the movement — so is the caliber now 32 mm? No matter. We carry on.

The 2428 movement leaving the case while seated in its larger 32 mm carrying ring
The defining quirk of the full-calendar Vostok: a 24 mm caliber carried in a 32 mm ring, which also bears the dial. Unlike the Slava 2428, this ring holds no quick-set mechanism — it exists purely to make the double calendar possible.

The caliber is out of the case.

The movement with its ring fully removed from the watch case
Movement and ring clear of the case, ready for the bench.

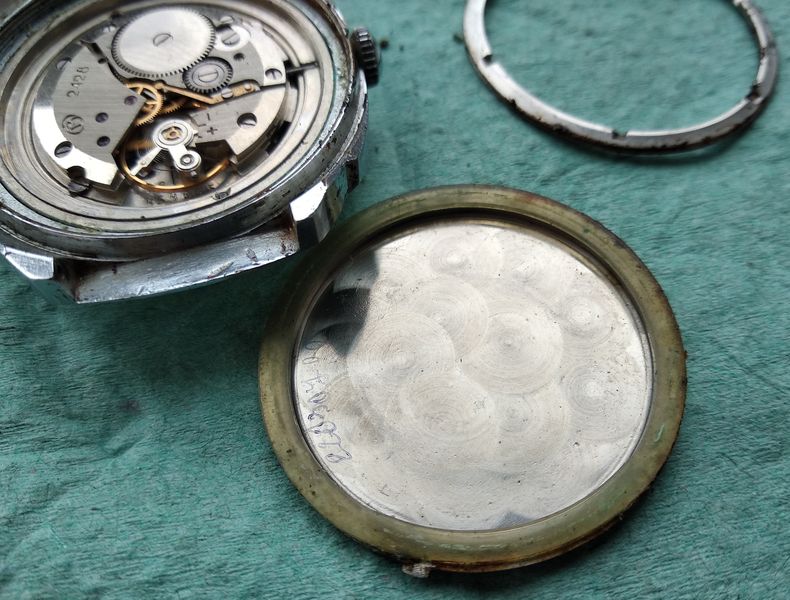
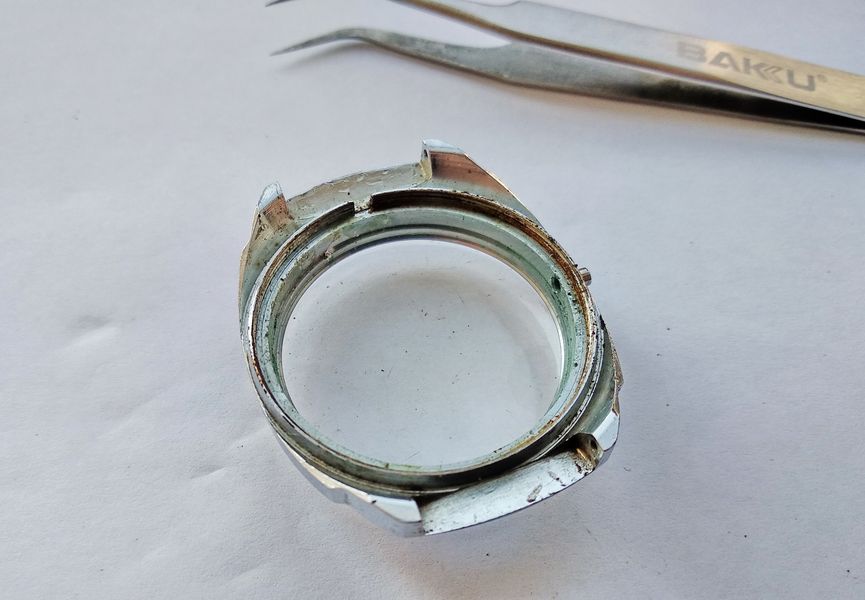
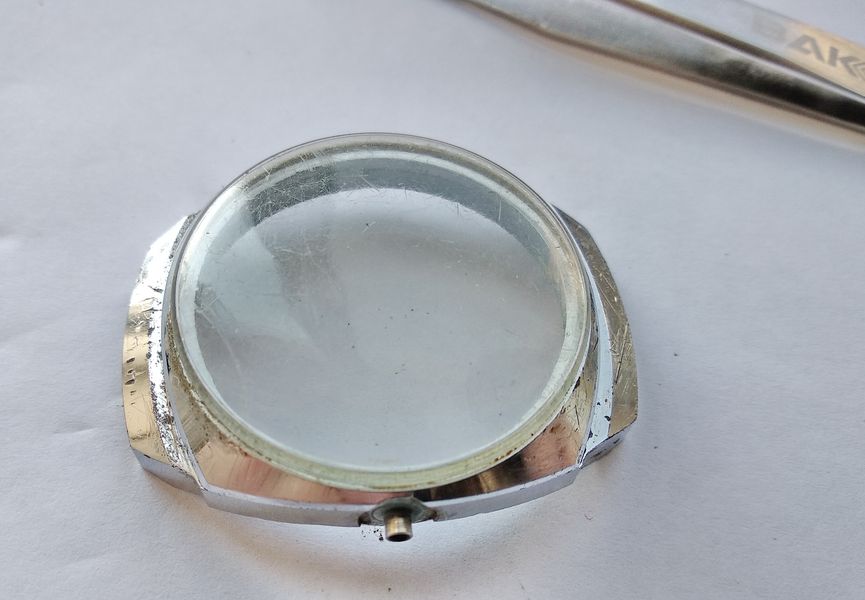
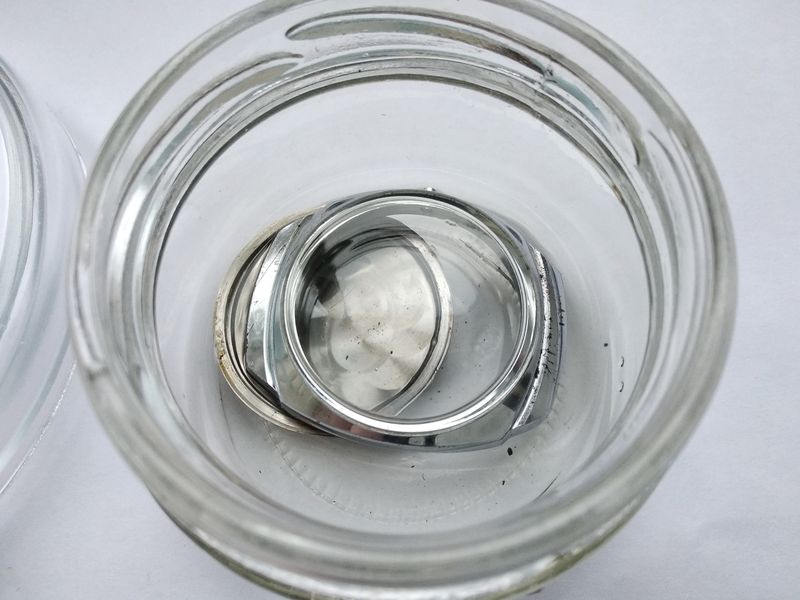
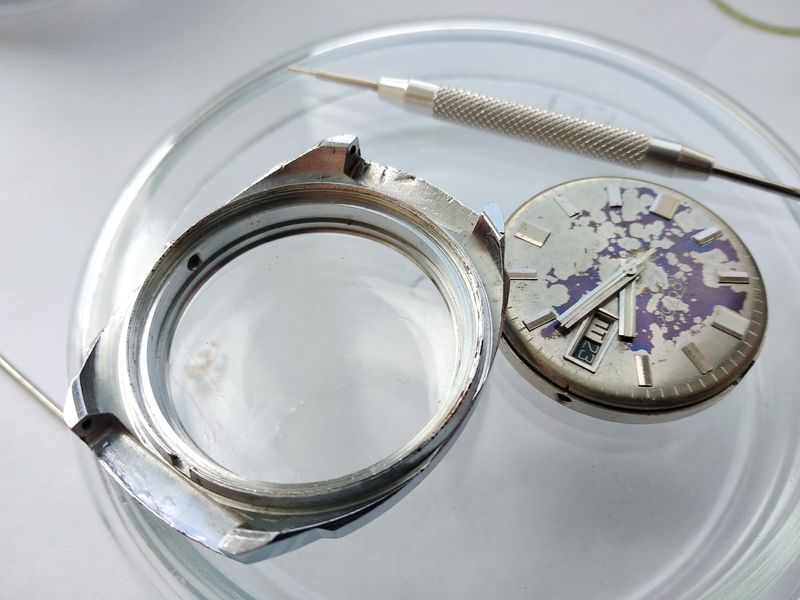
The case is large and, again, soundly built. It needs washing, of course. This is how it looks from the inside,

The interior of the empty watch case before cleaning
The case interior — dirty, but structurally excellent and worth the cleaning it is about to get.

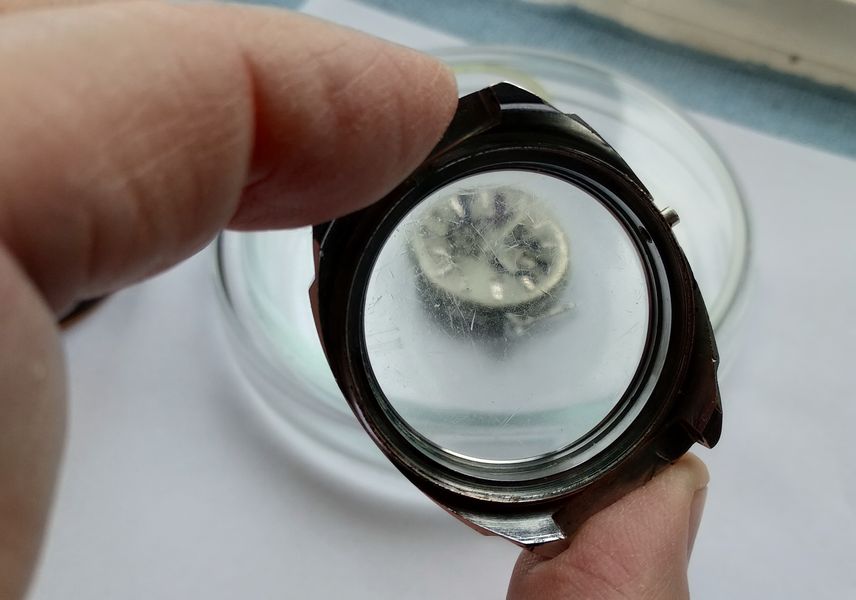
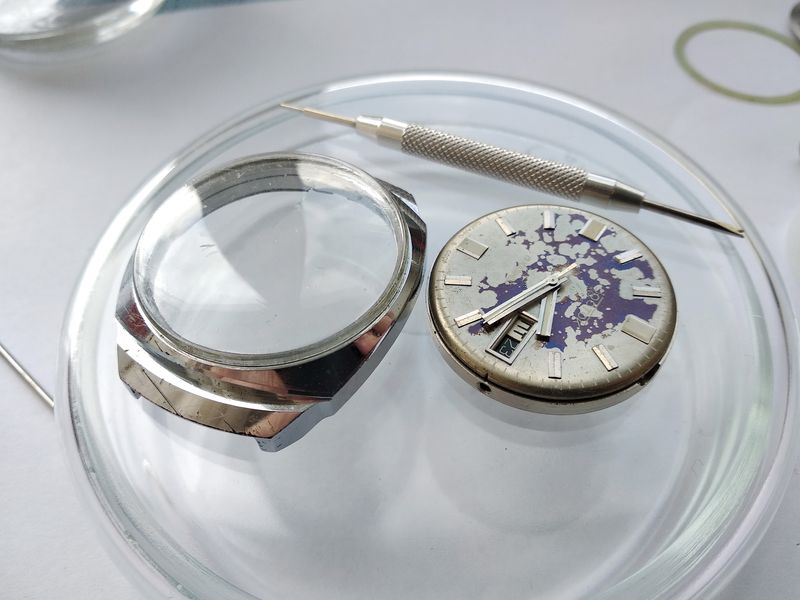
and this is the outside. The crystal, naturally, is also bound for polishing. How could it not be?

The exterior of the watch case and its scratched crystal before restoration
The case from outside, the crystal hazed and scratched. Both will be addressed before the watch goes back together.

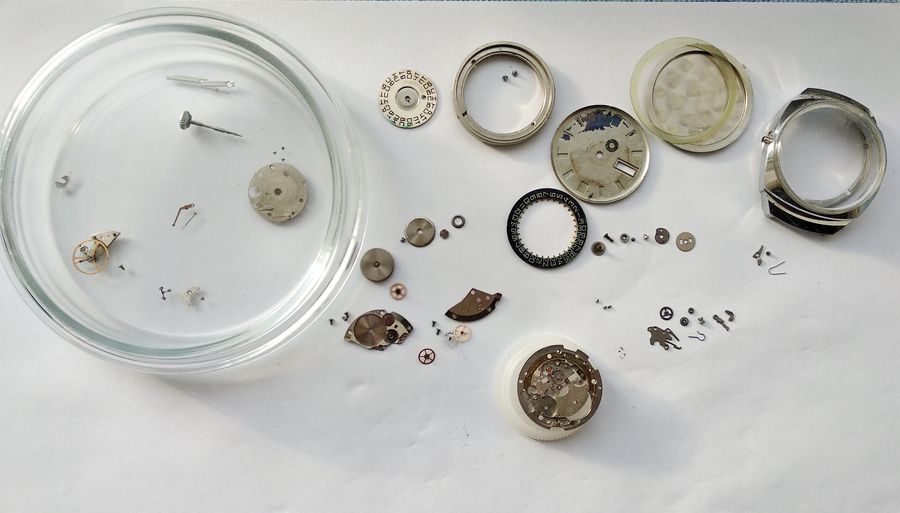
For now the movement goes into a Petri dish — no sense letting it gather dust.

The movement set aside under a Petri dish for protection
The movement parked under a Petri dish while attention turns to the case.

The case parts are flooded with benzine and left until tomorrow. We will pick it up in the morning — it is getting dark, and these eyes are neither official issue nor young.

The disassembled case components soaking in benzine overnight
Case components left to soak overnight in benzine — the patient, unhurried half of restoration.

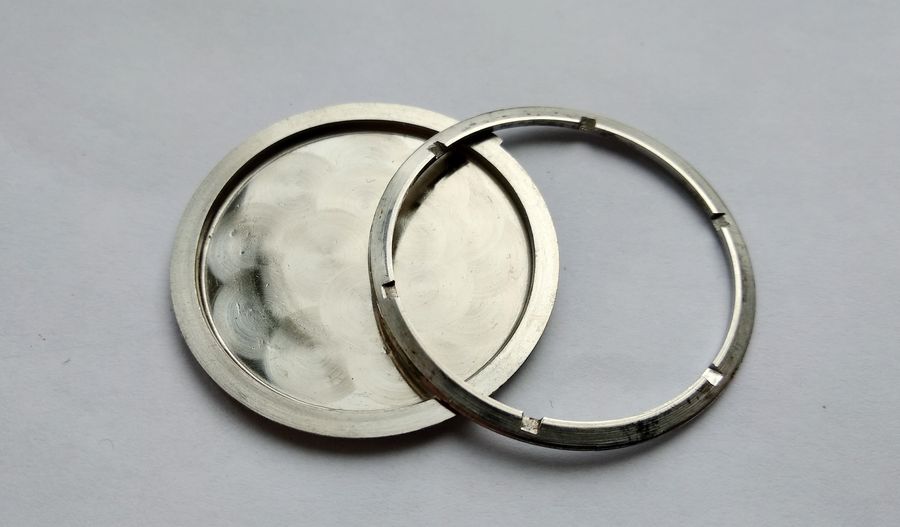
Morning, and with fresh eyes we scrub all of it spotless with a stiff brush. The back and the ring come up in perfect condition.

The cleaned case back and carrying ring after scrubbing
After an overnight soak and a stiff brush, the back and the carrying ring are immaculate.

The case body itself — well, the most that could be done was to wash off the dirt. And the crystal, ugly thing that it is, we will come back to; toothpaste stands ever ready to serve the great art of watchmaking. With that, the case is set aside and we turn to the main event: the overhaul of the Vostok 2428.

The cleaned empty case held up and viewed through its hazy scratched crystal
The case washed but the crystal still cloudy — held to the light, you can see straight through the haze to the bench beyond. The toothpaste comes later.

The Calendar Side

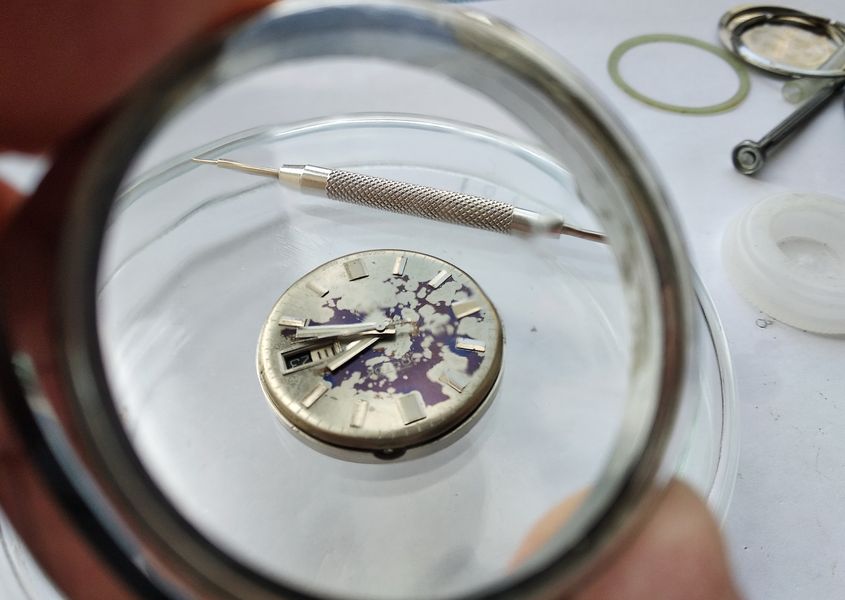
There it is, waiting impatiently to be taken down to its components.

The 2428 movement on the bench ready for disassembly
The movement, out of its case and waiting for the strip-down to begin.

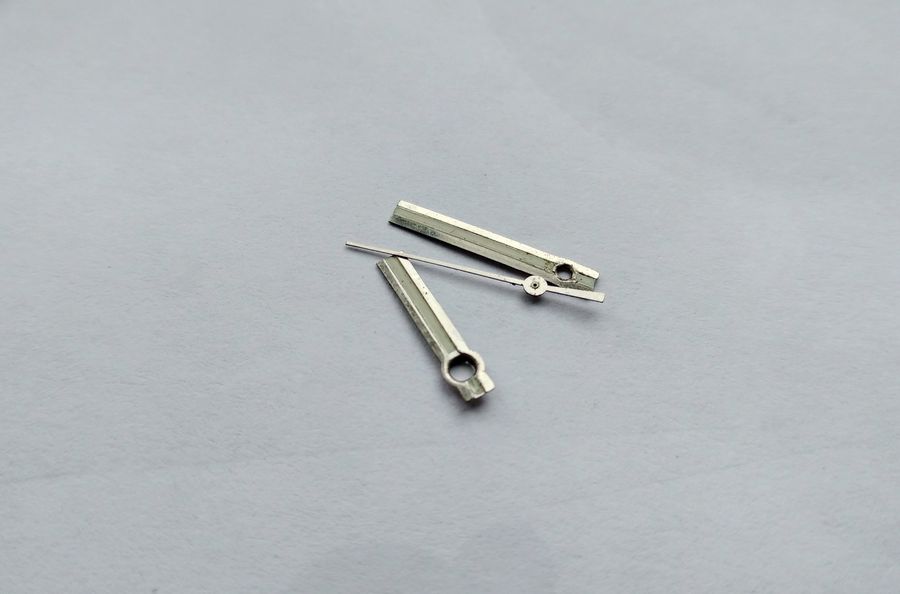
As always, we start by removing the hands. I have described how that is done dozens of times, so I will spare the details. The hands are off, and here they are.

The watch hands removed and lying on the bench
Hands removed and set aside — the routine first move of every teardown.

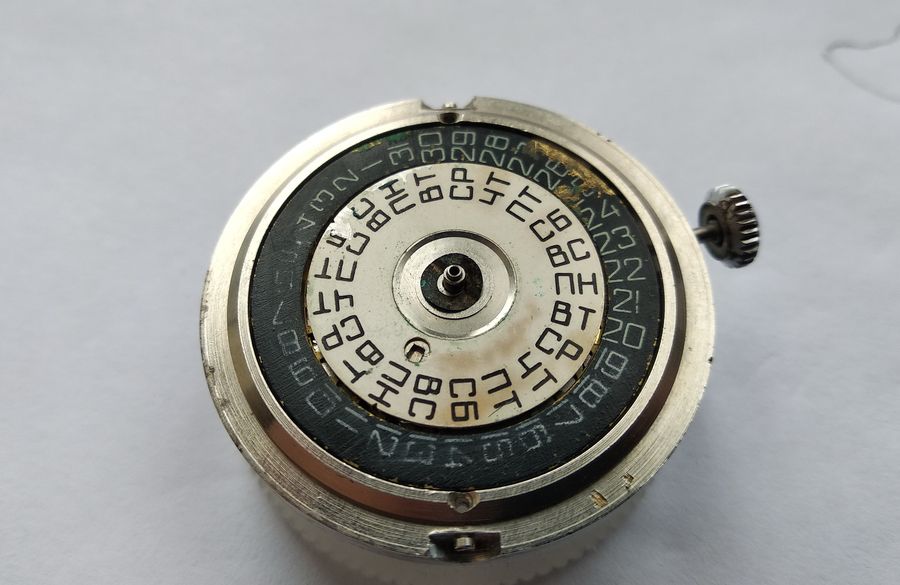
Now we take off the dial with its map of a parallel reality.

The stained dial about to be lifted from the movement
The dial, ready to come away. Its weathered surface really does look like cartography from somewhere else entirely.

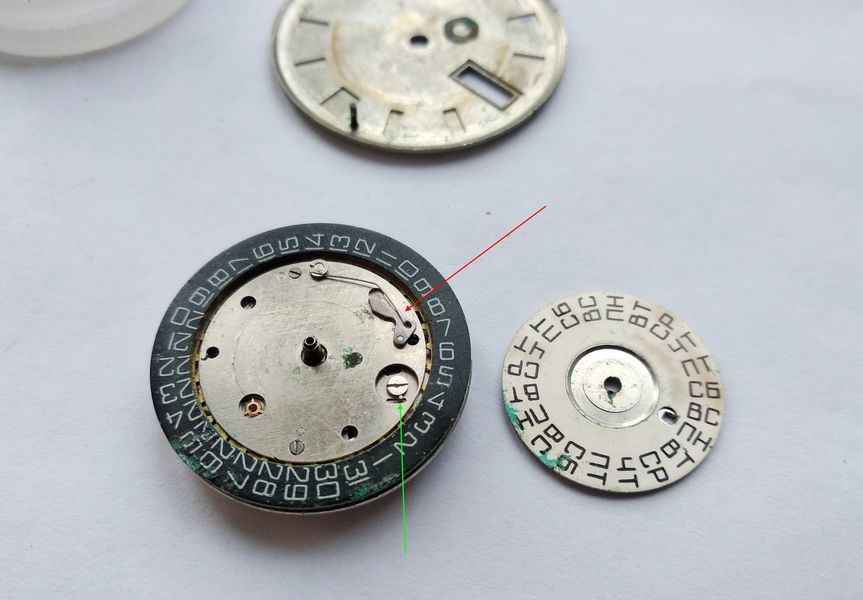
For this we loosen the two screws that hold the caliber in its ring — the green arrows. Strictly speaking this can be done later; I have jumped ahead a little.

The two screws securing the caliber within its ring indicated by green arrows
The two screws clamping the caliber into the ring. They can wait, but it does no harm to slacken them now.

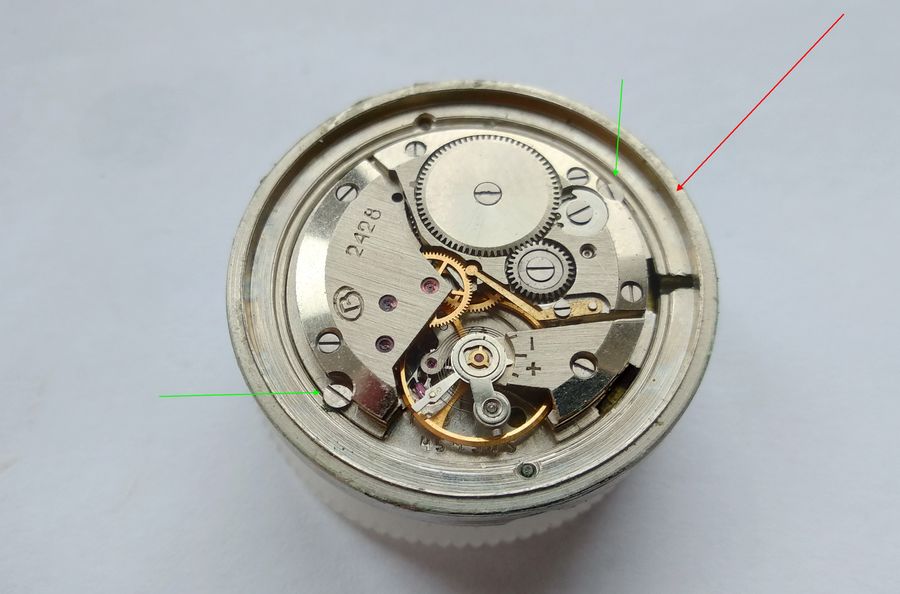
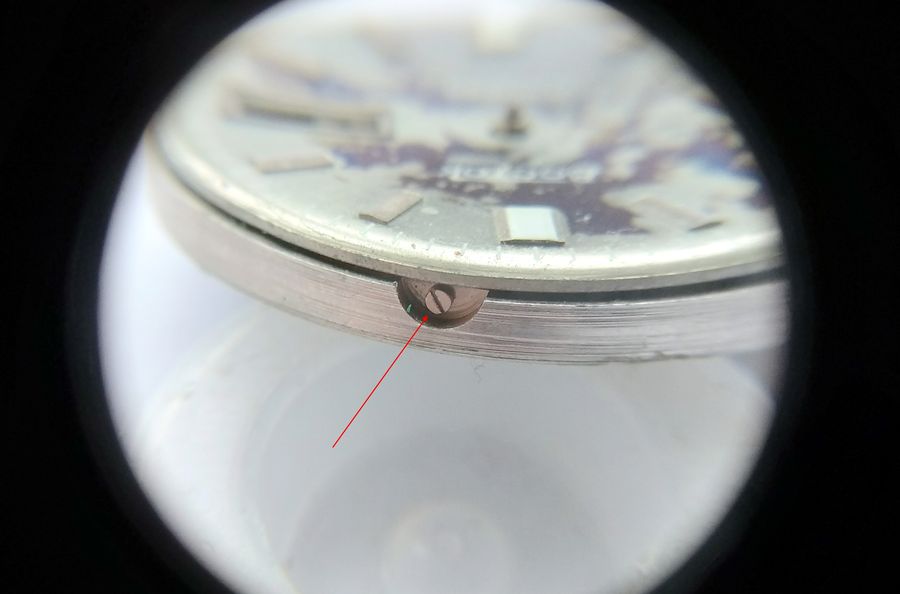
Then we loosen the screws on the side of the ring that hold the dial feet. These are large, so a standard screwdriver suits them.

Loosening the large dial-foot screws on the side of the carrying ring
The dial feet are clamped from the side of the ring with generously sized screws — no jeweler's driver needed here.

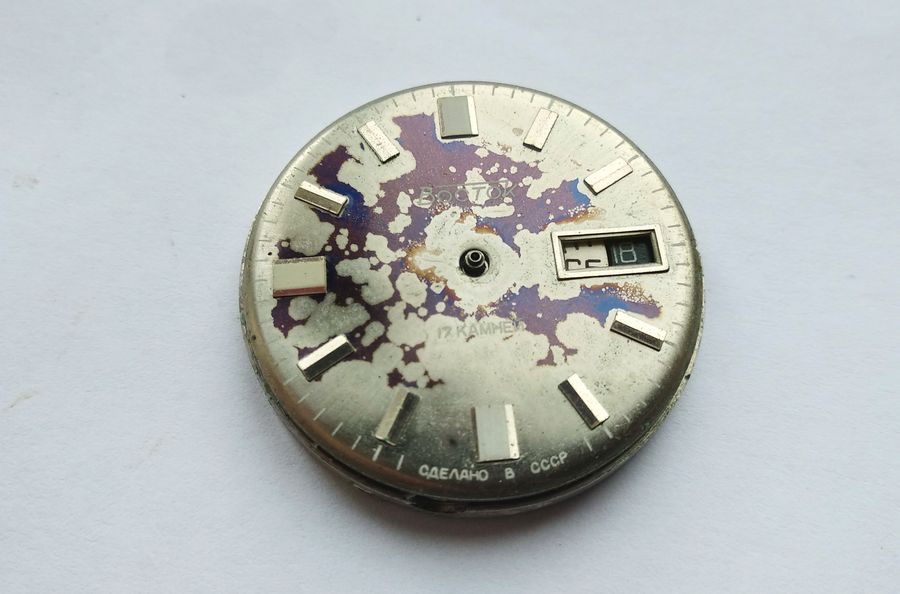
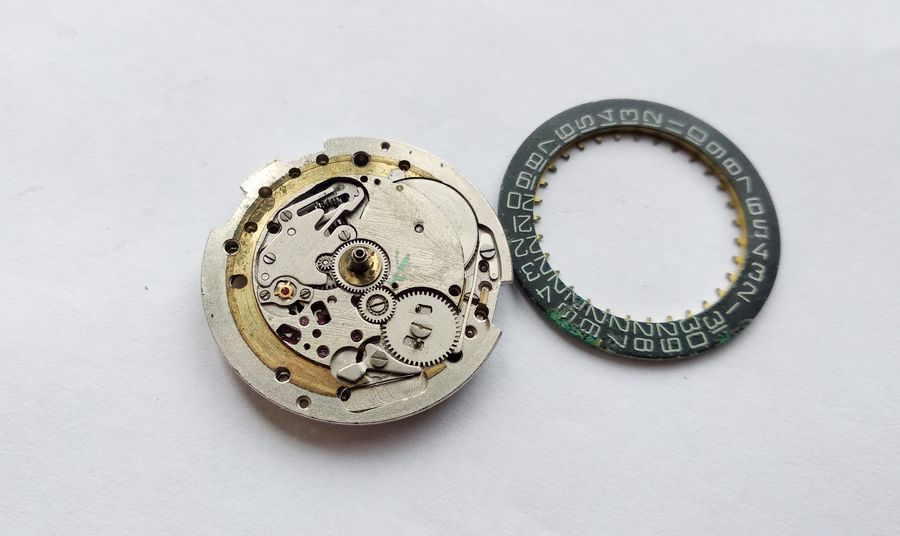
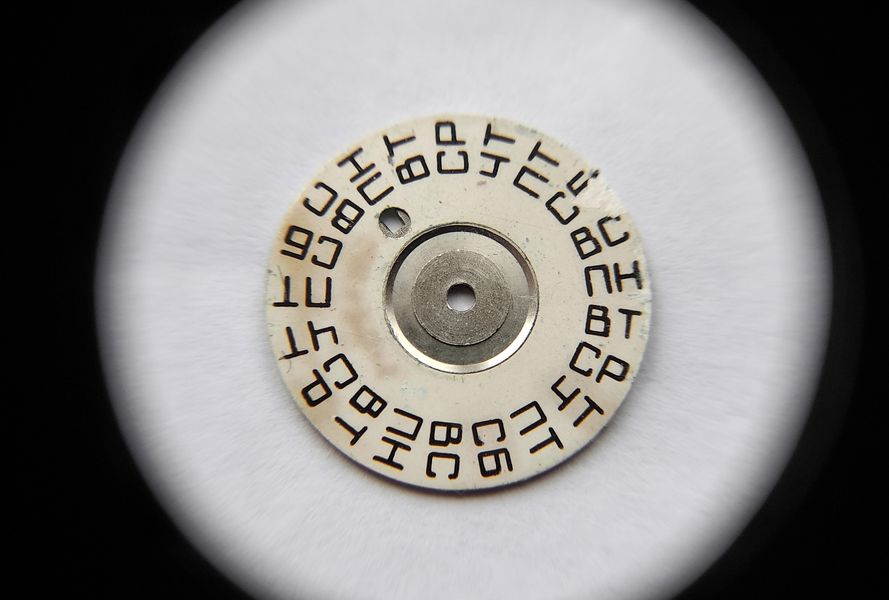
Then simply lift the dial away. Done. Before us are the calendar discs, and an interesting touch: they are two-tone. The days of the week are printed black on white, while the dates are reversed — white on black.

The calendar discs revealed under the removed dial, one printed black on white and the other white on black
Under the dial, the two calendar discs. The days of the week read black on white, the dates in reverse — white on black — a small but deliberate piece of legibility design.

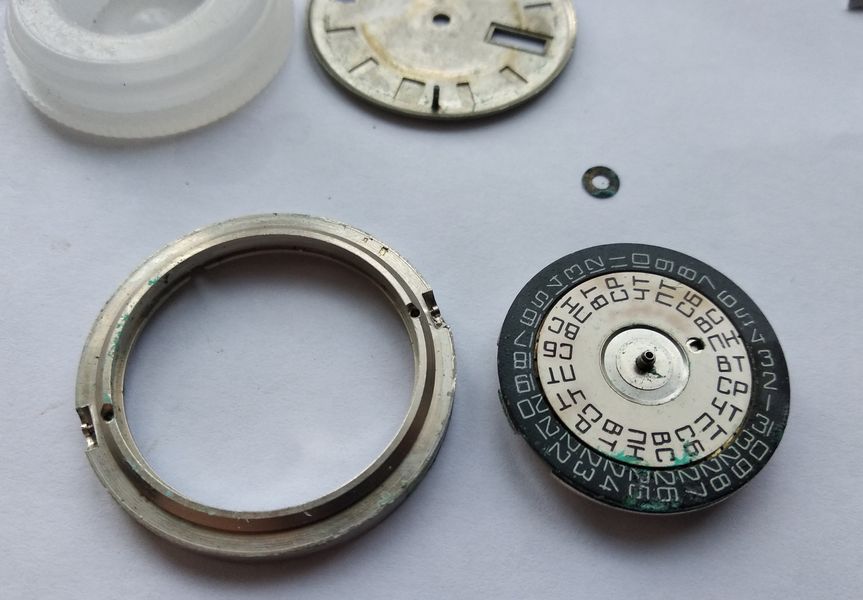
Nudging the movement from below, we part it from the ring. The dial, by the way, is made by stamping; the hour markers are raised, and the part itself is a kind of shallow pan with turned-up edges. The reason is plain — the calendar scales must travel freely beneath it.

The movement separated from its carrying ring, with the stamped pan-shaped dial alongside
Movement and ring separated. The stamped dial is shaped like a shallow pan with raised rims, leaving clearance for the calendar discs to sweep around underneath.

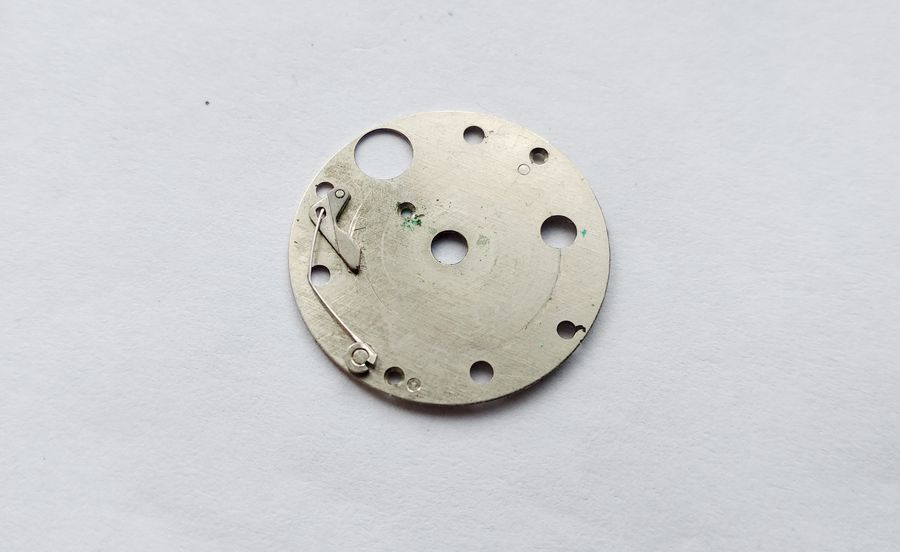
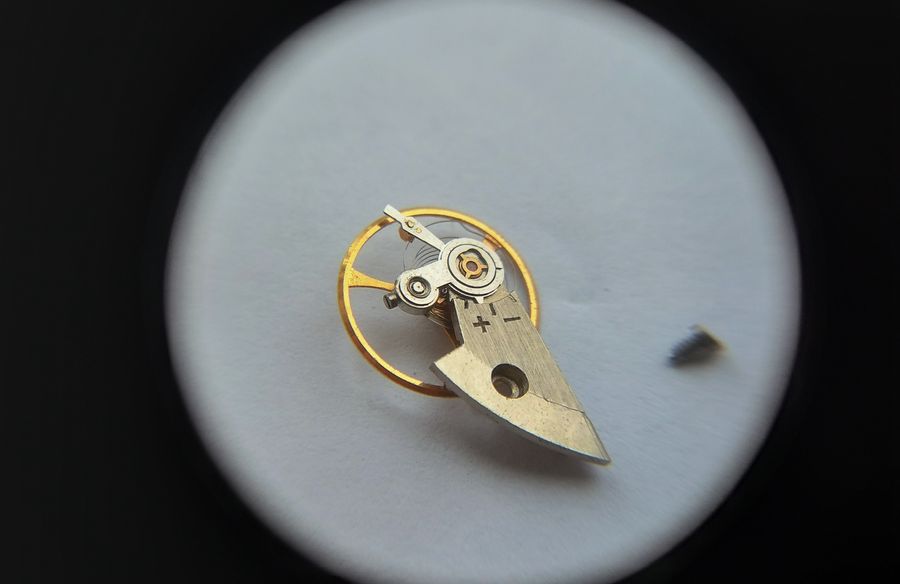
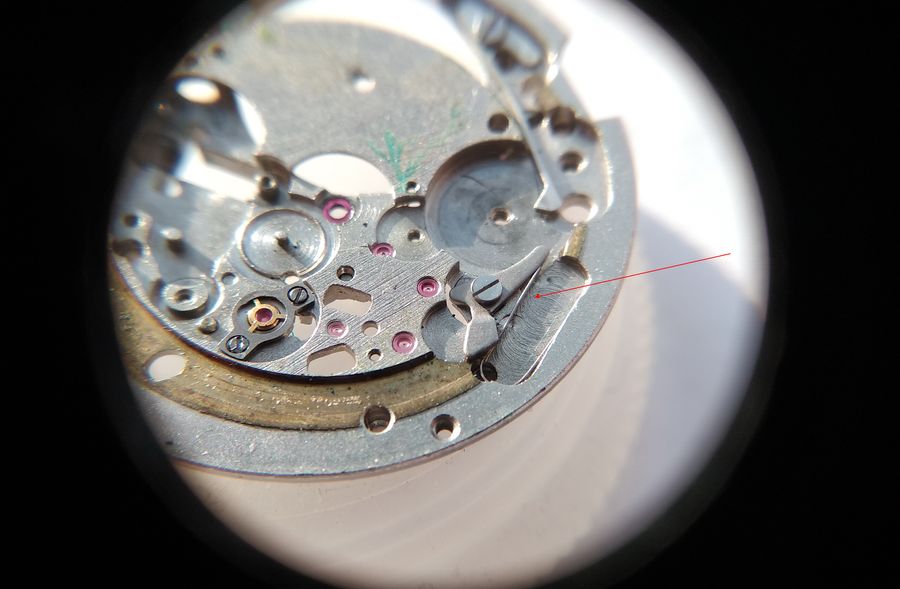
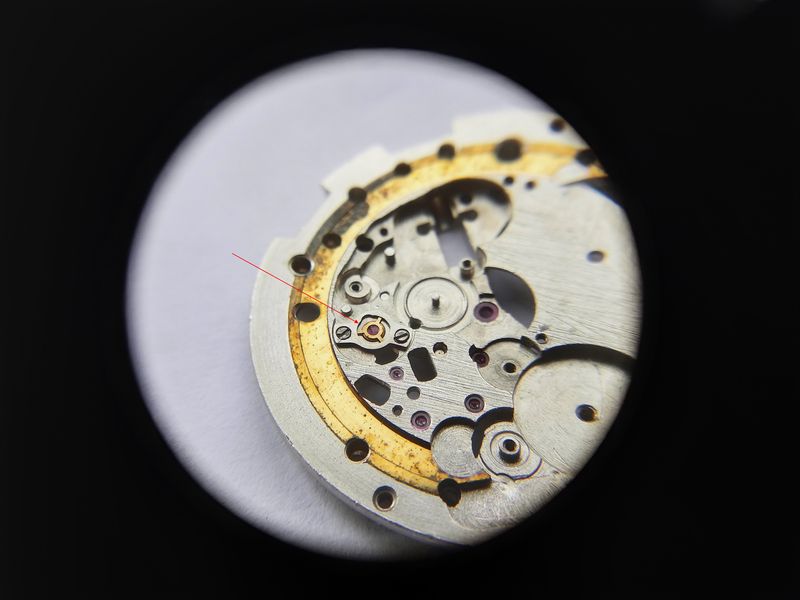
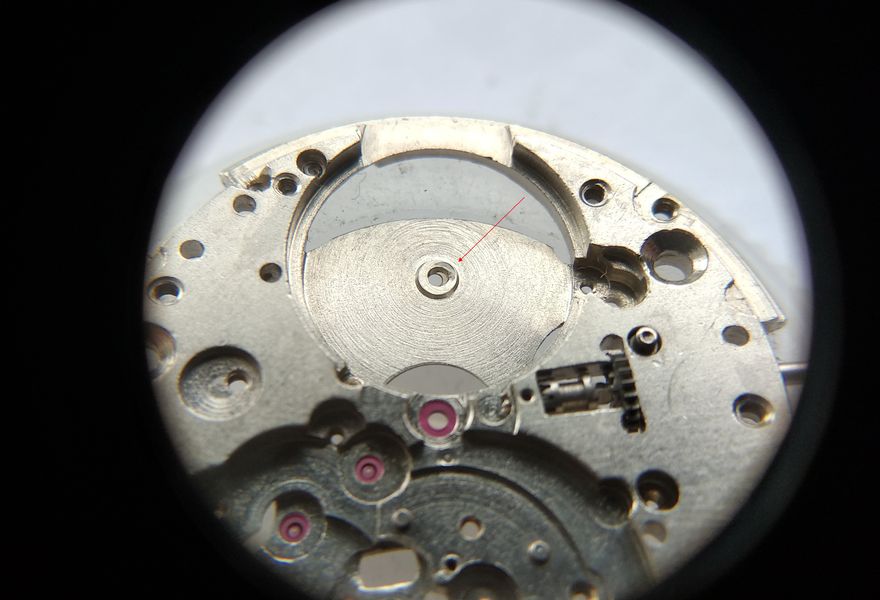
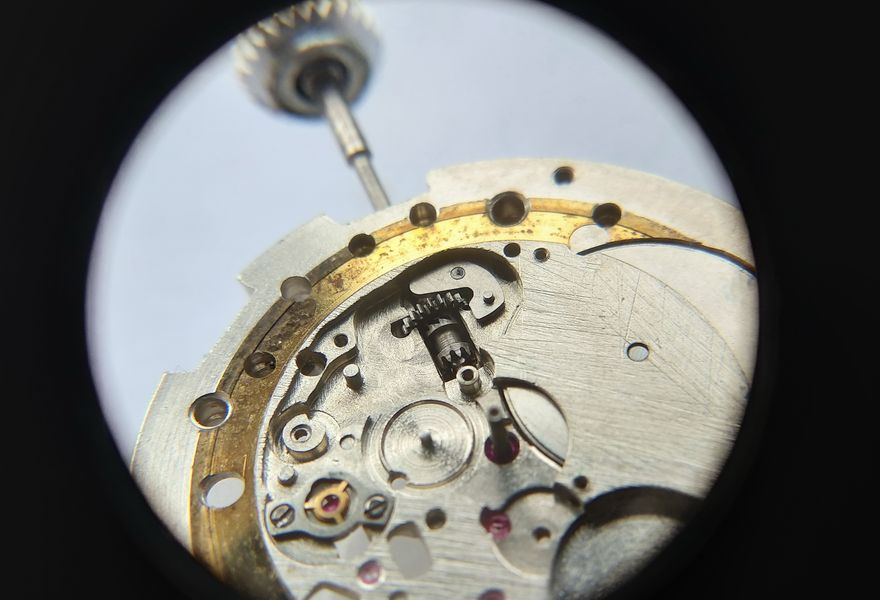
We remove the day-of-week disc. Have I not yet mentioned that the calendar here is instantaneous on both the date and the day? Indeed it is — the switch happens in an instant, and that despite a strikingly simple calendar design we will study in more detail shortly. For now we can see the day-disc detent lever with its spring (red arrow) and the disc-shifting finger (green arrow). We will return to this assembly when the caliber goes back together.

The day-of-week disc removed, exposing its detent lever with spring and the shifting finger
The day-of-week disc lifted off. The detent lever and its spring (red) hold the disc; the shifting finger (green) advances it. Both switch the indication instantly despite the spare construction.

This is the underside of the day-of-week disc.

The reverse side of the day-of-week calendar disc
The day disc seen from behind, showing the toothing the shifting finger acts on.

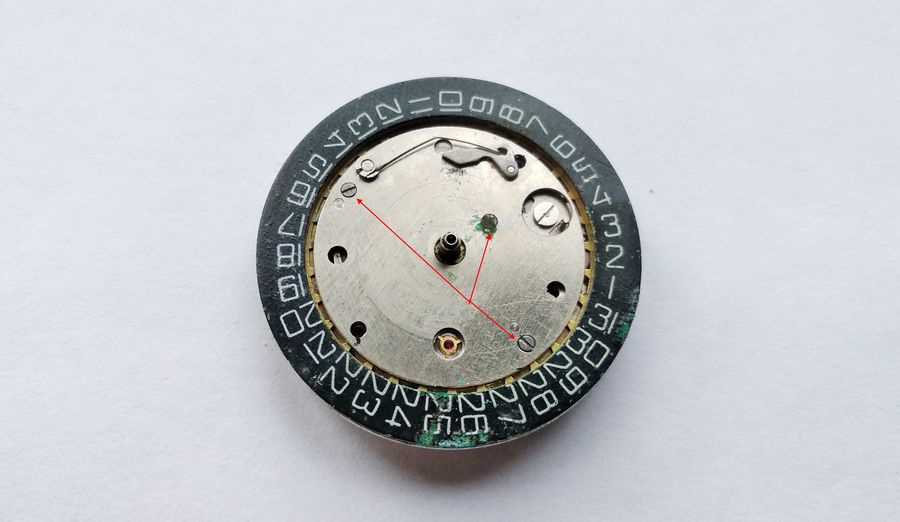
We continue, removing the day-disc plate. For this we undo the three screws marked with red arrows.

Removing the day-disc support plate by undoing three screws marked with red arrows
The plate carrying the day disc is freed by three screws — the red arrows mark them.

Done.

The day-disc support plate removed from the movement
The plate off, the calendar works beginning to open up.

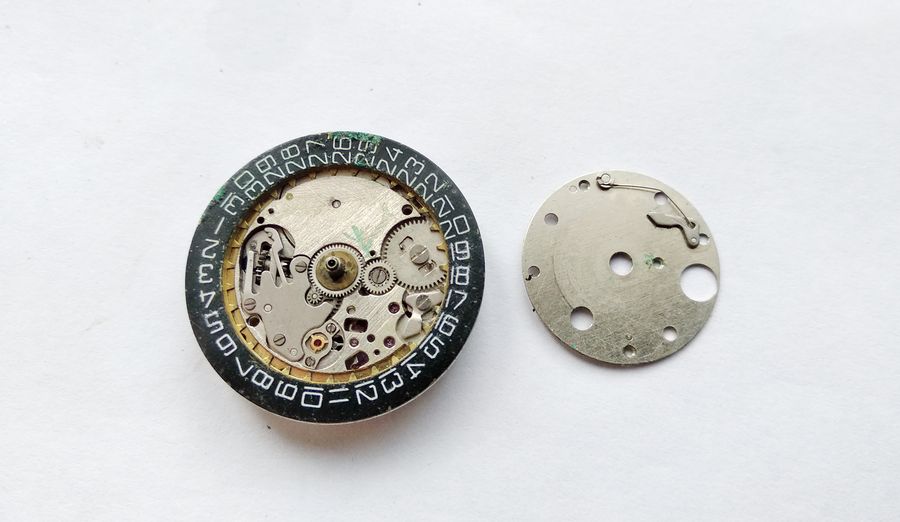
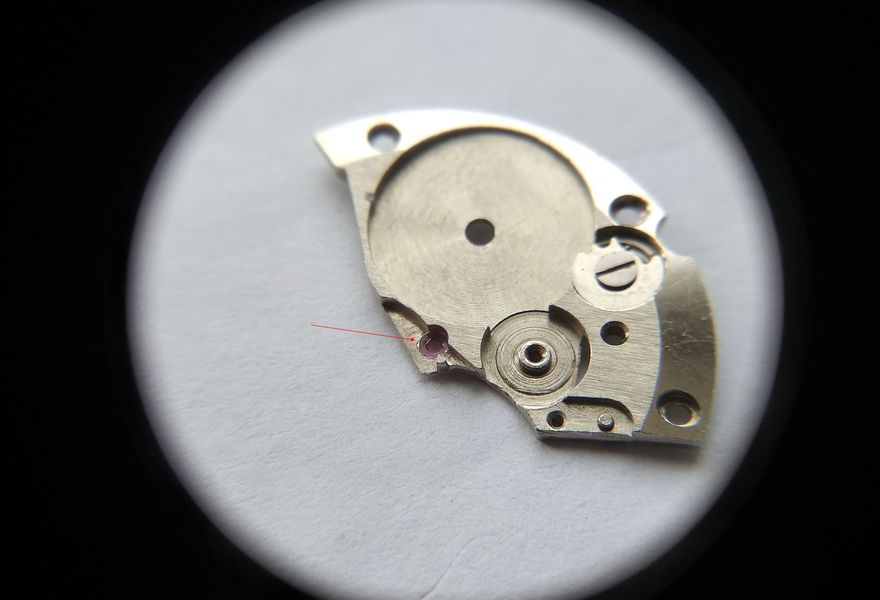
This is the plate from the reverse.

The underside of the day-disc support plate
The support plate from below.

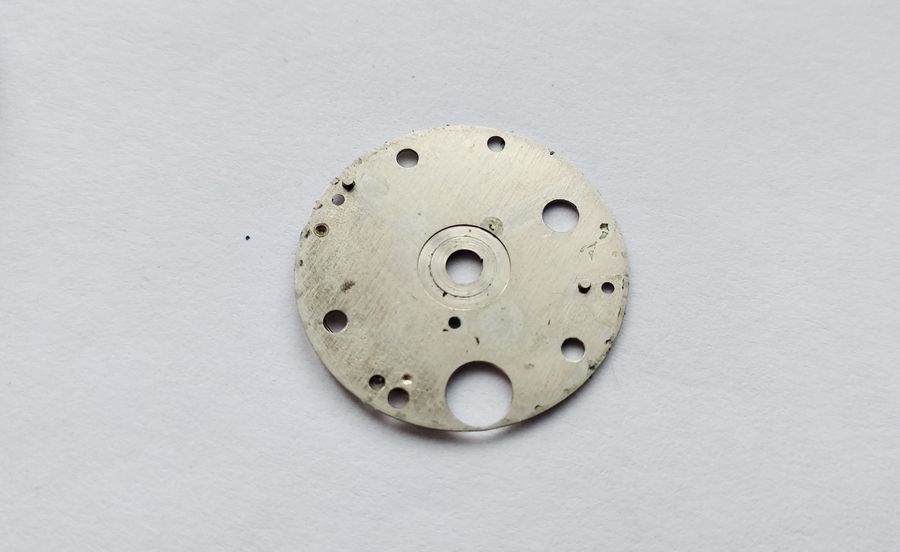
And in this photograph the construction of the disc detent can be examined more closely. It is austere to the point of asceticism — and precisely because of that, nothing scatters across the bench during service, as it does in so many other watches. Quite simply, ideally made.

Detailed view of the simple disc detent construction
The detent mechanism in detail. Spare, robust, and self-contained — there is nothing here to spring loose and vanish, which is more than can be said for most calendar works.

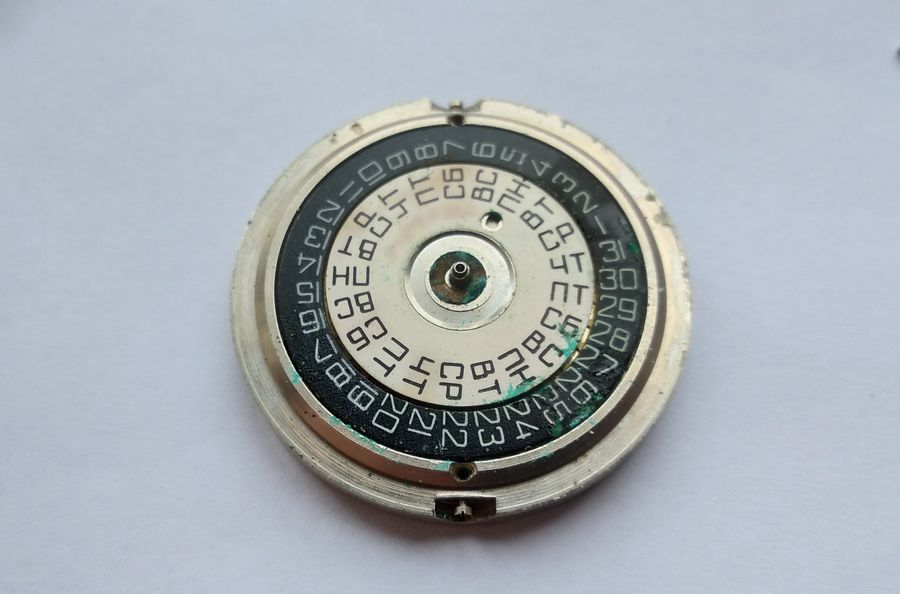
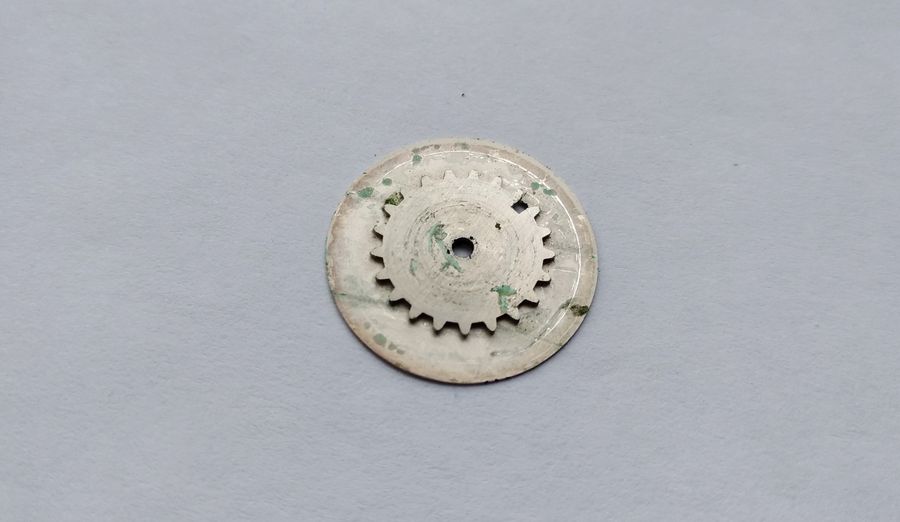
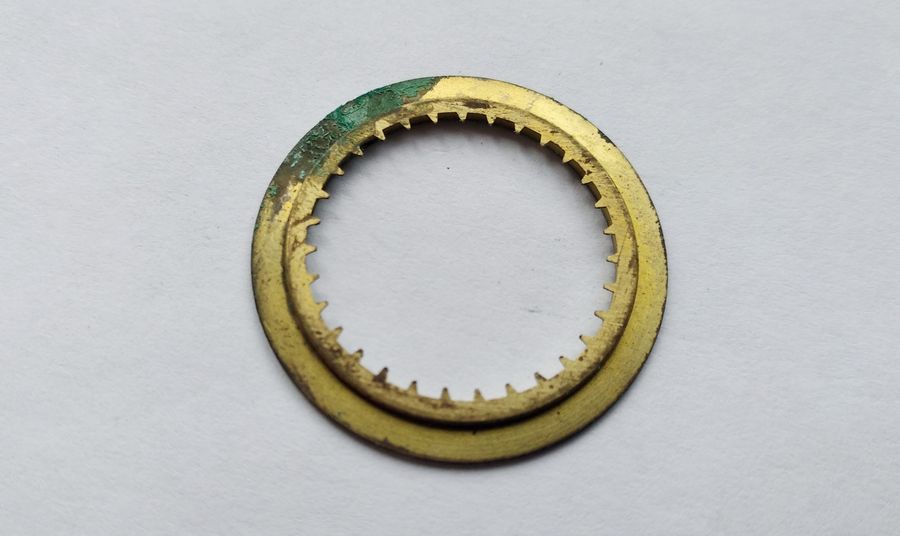
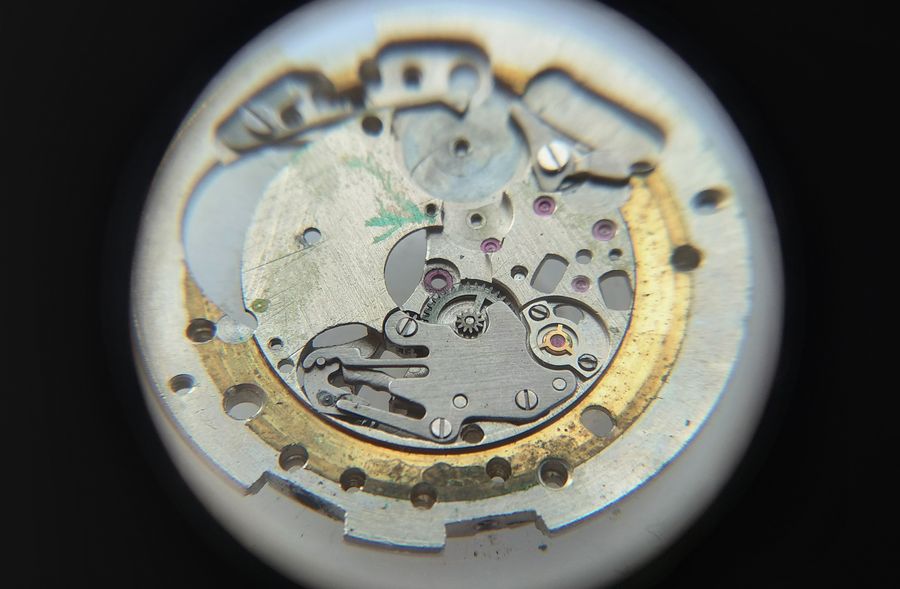
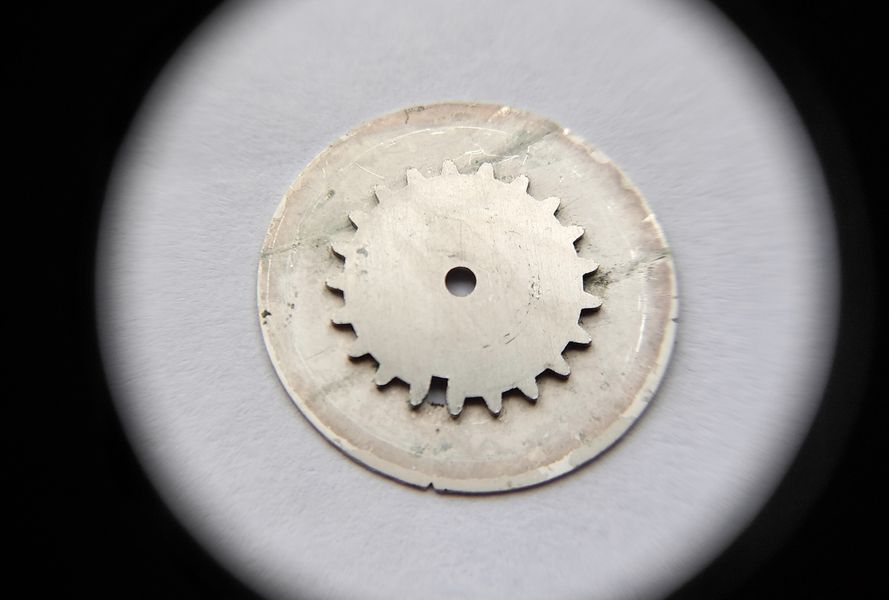
We remove the date disc.

Removing the date disc from the calendar mechanism
The date disc comes off next.

Yes. There is a fair amount of work ahead with this one — it is heavily oxidized.

The date disc showing heavy oxidation
The date disc, badly oxidized. Restoring it legibly will take some patience.

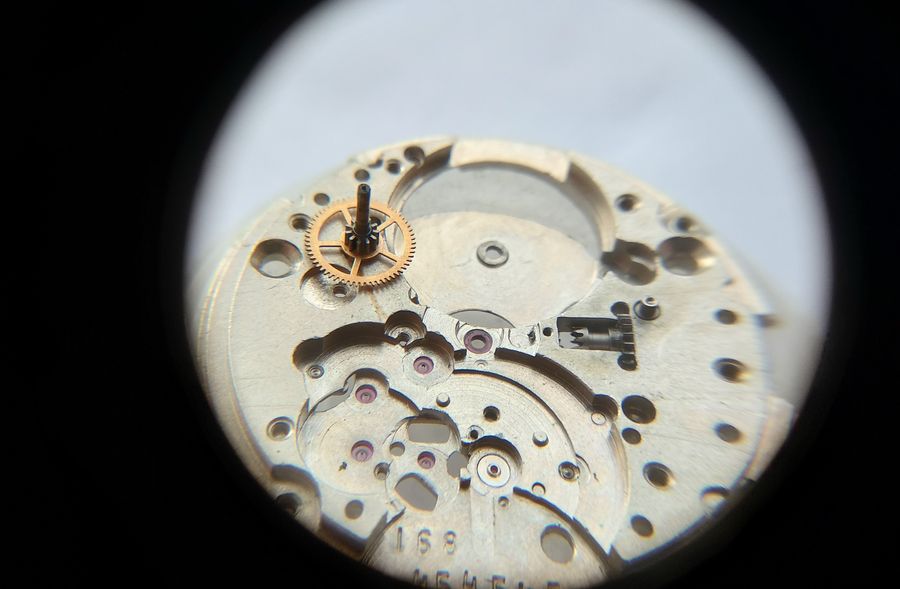
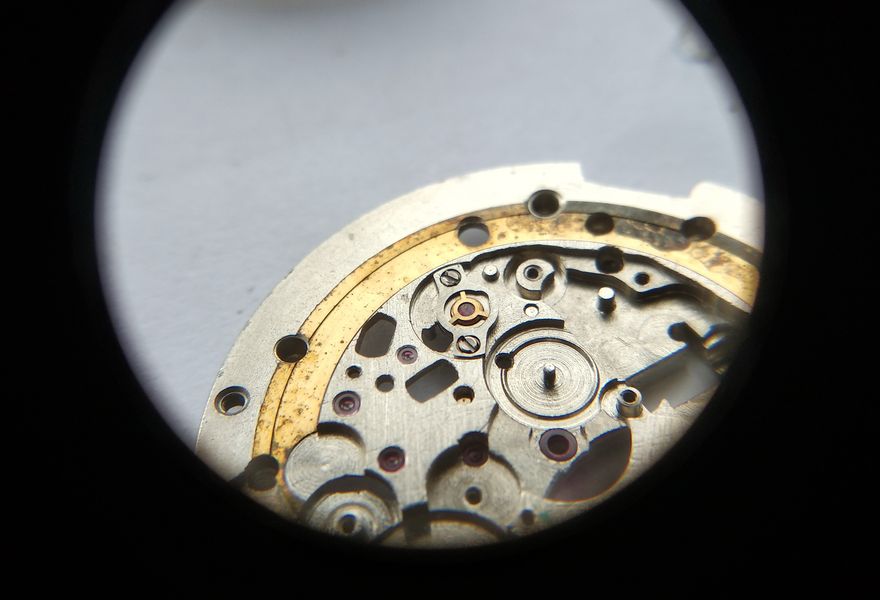
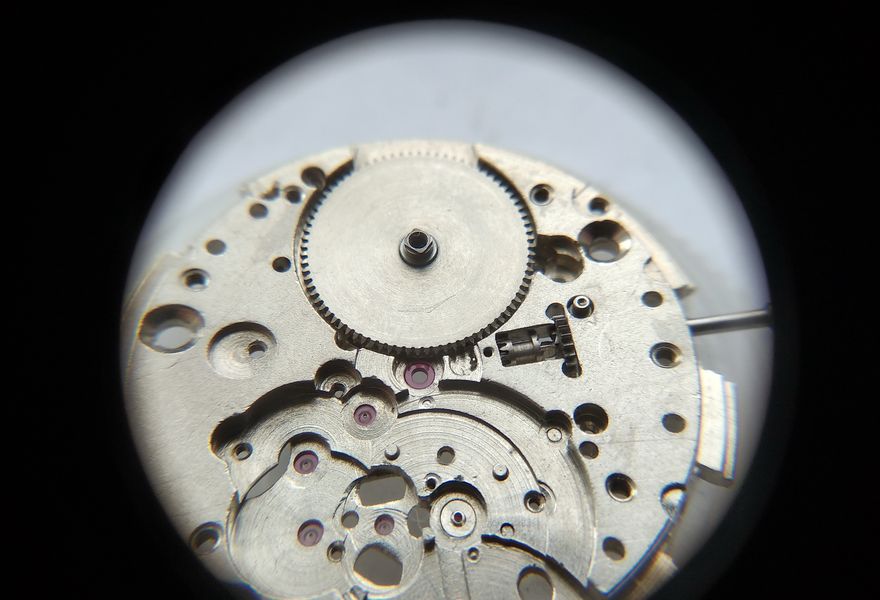
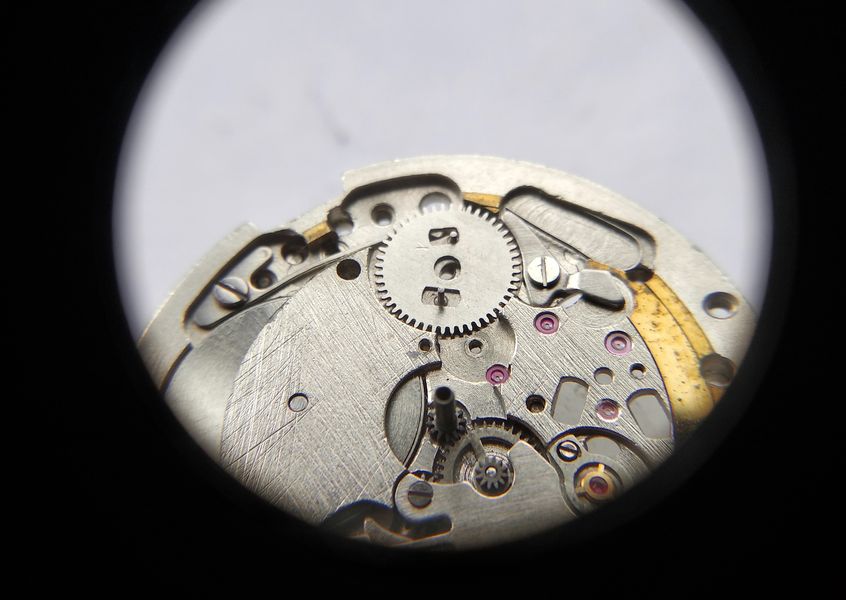
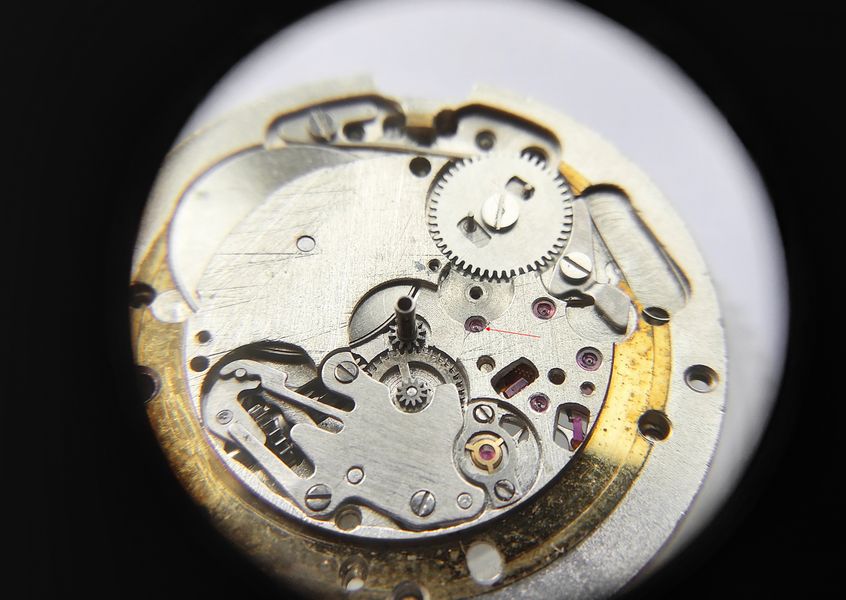
Here it is, the calendar mechanism. We can see the command mechanism with its shifting fingers, the accumulator spring, the date-disc detent lever with its U-shaped spring, the hour wheel, and a small two-tier wheel. And, of course, the keyless works, closed under their spring cover.

Overview of the 2428 calendar mechanism with command works, accumulator spring, detent lever and two-tier wheel
The calendar mechanism laid open: the command works with shifting fingers, the accumulator spring, the date-disc detent lever with its U-spring, the hour wheel, the little two-tier wheel — and the keyless works under their cover plate.

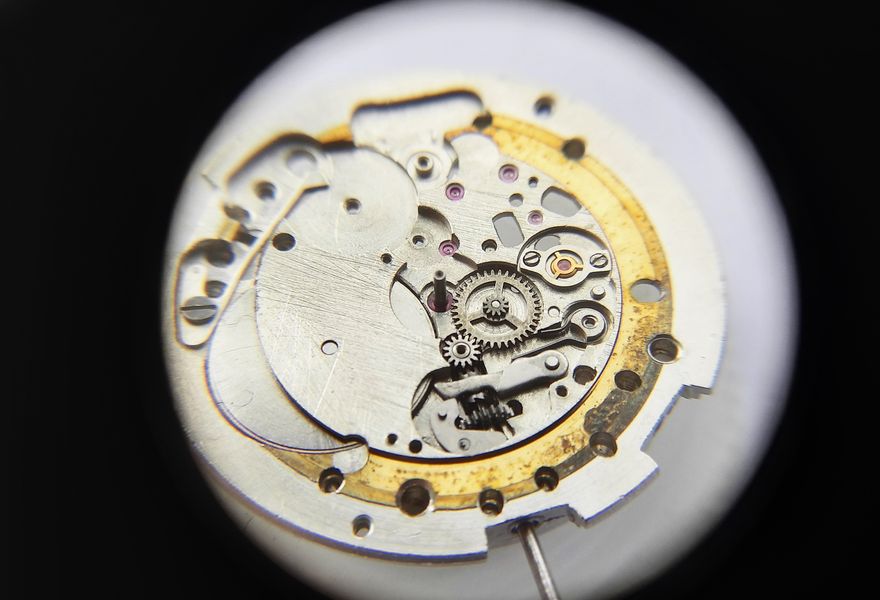
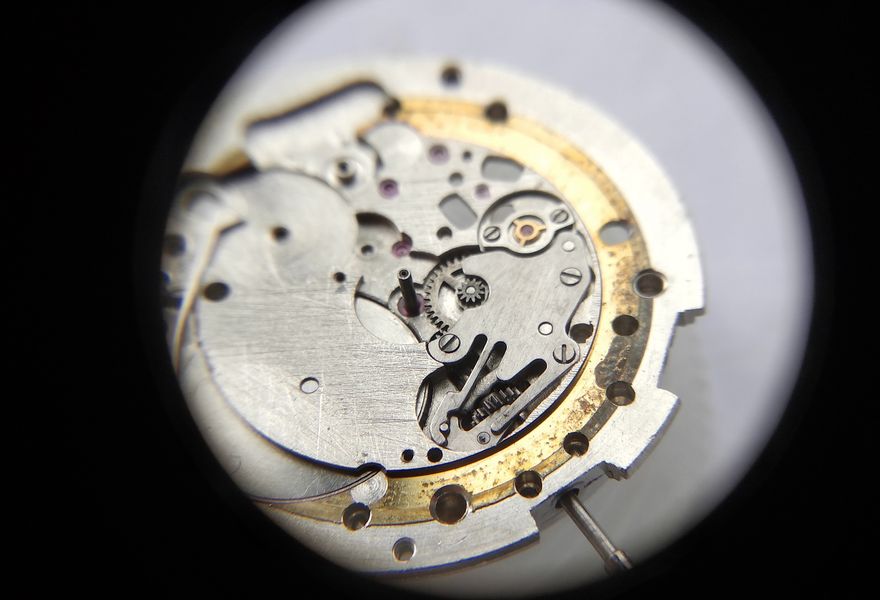
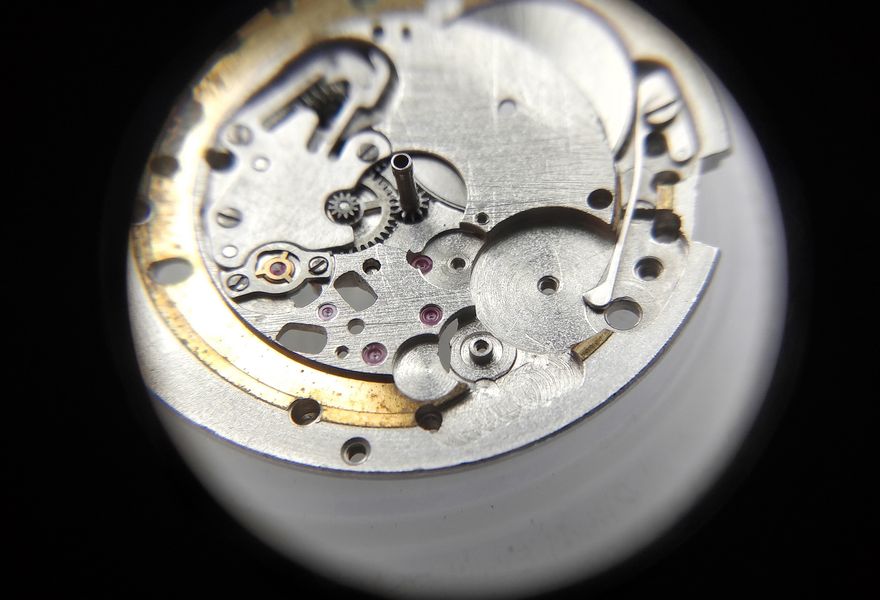
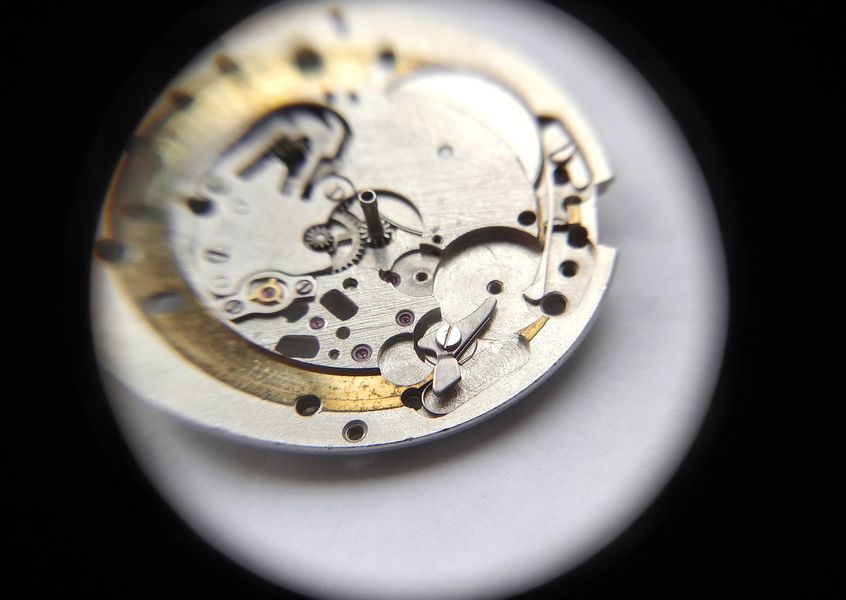
We take apart the calendar drive and at once remove the cannon pinion. Here are the hour wheel, the cannon pinion, and the two-tier calendar wheel. Next is the eccentric with its cammed surface and two shifting fingers, one taller than the other. The short finger advances the date disc, the tall one the day-of-week disc. Beside the eccentric sits the calendar wheel.

The disassembled calendar drive: hour wheel, cannon pinion, two-tier wheel and the eccentric with two shifting fingers of different heights
The calendar drive broken down. The cammed eccentric carries two fingers of unequal height — the short one drives the date disc, the tall one the day disc — with the calendar wheel alongside.

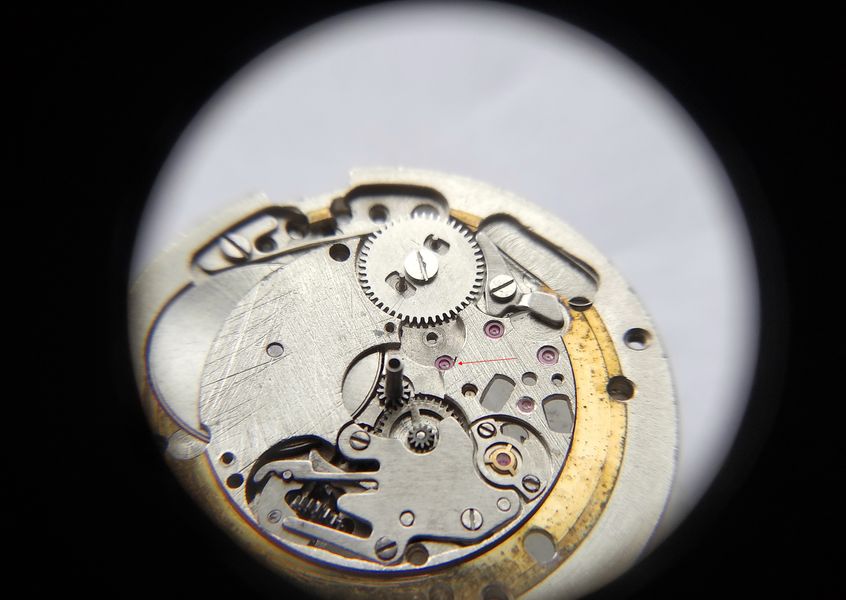
Here the accumulator spring is clearly visible, its beak riding the cam of the eccentric. This is what distributes the effort as energy builds in the spring — the secret of an instantaneous jump from a simple mechanism. That is all on the slow side for now; we will come back to it after the balance is off and the going train and mainspring barrel are stripped.

The slow side of the movement showing the accumulator spring with its beak resting on the eccentric cam
The accumulator spring, its beak bearing on the eccentric's cam. Storing and then releasing energy in one stroke is exactly how this modest layout achieves an instant calendar change.

The Going Train, and a Balance Worth Admiring

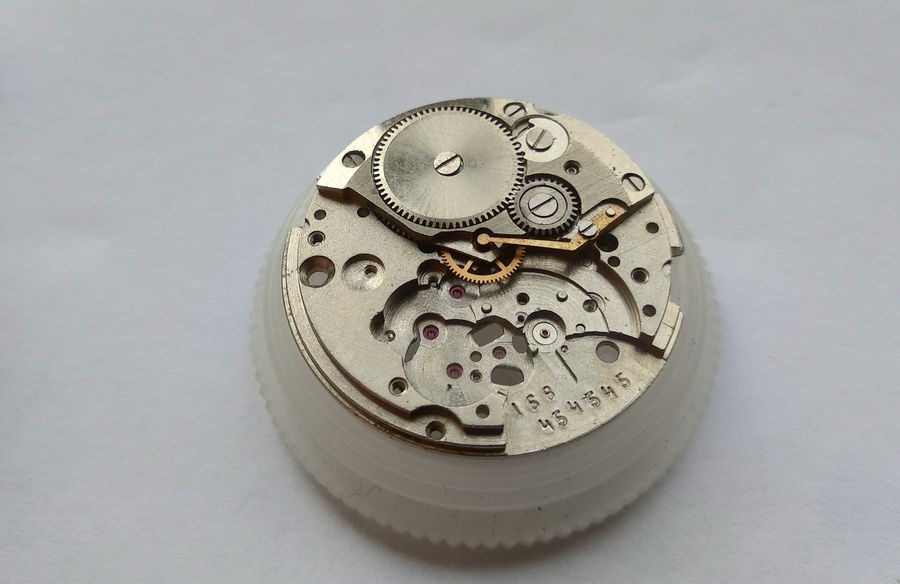
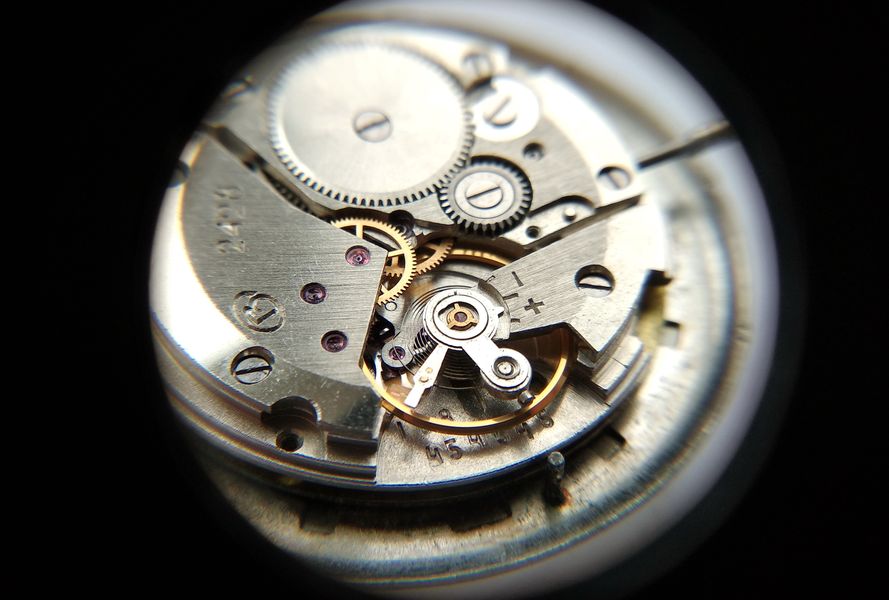
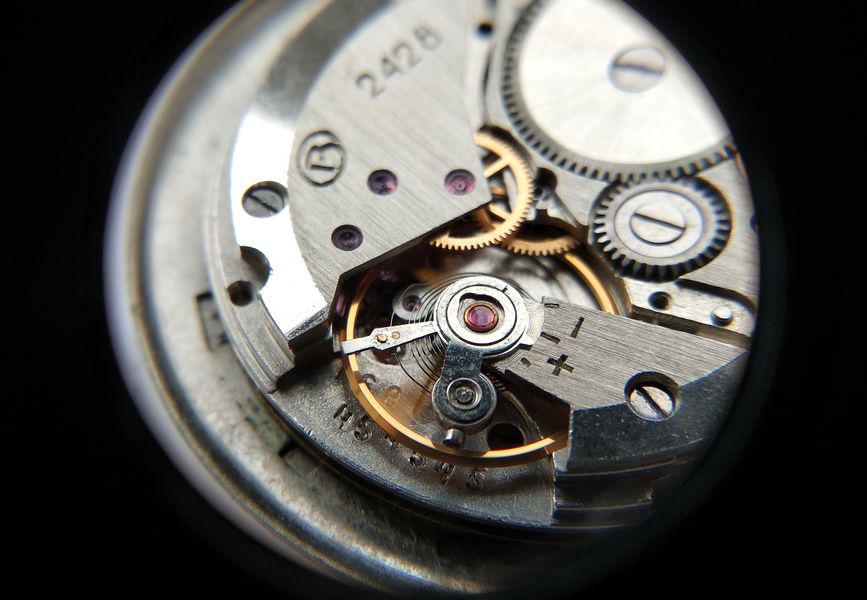
Now we are on the fast side. Note the quality of the bridges, and the chamfers in particular — the first sign of a hand-assembled movement. Later the bevels were dropped in favor of machine assembly. So, off comes the balance.

The train side of the 2428 with chamfered bridges and the balance still in place, the caliber number marked on the plate
The train side, caliber 2428 stamped on the plate. The hand-applied chamfers on the bridges mark this as early, hand-finished work — a refinement deleted once production moved to machine assembly.

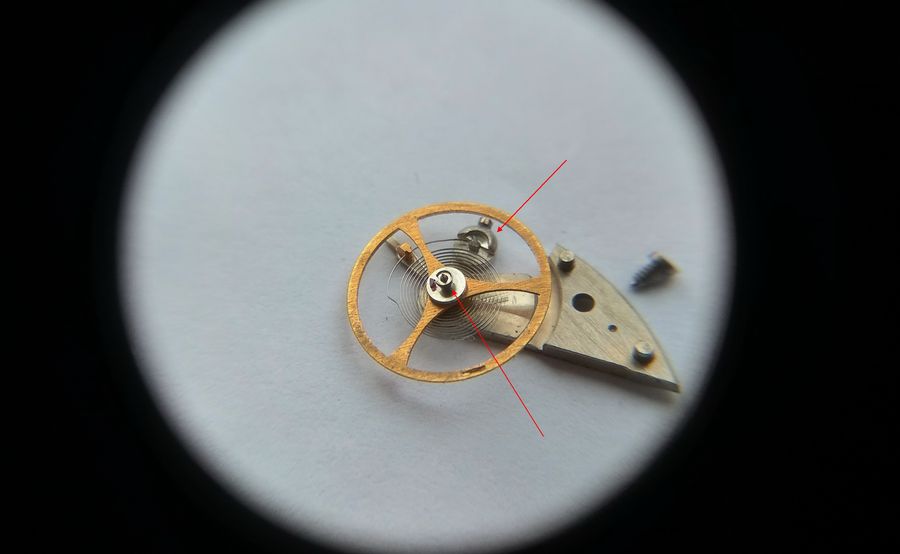
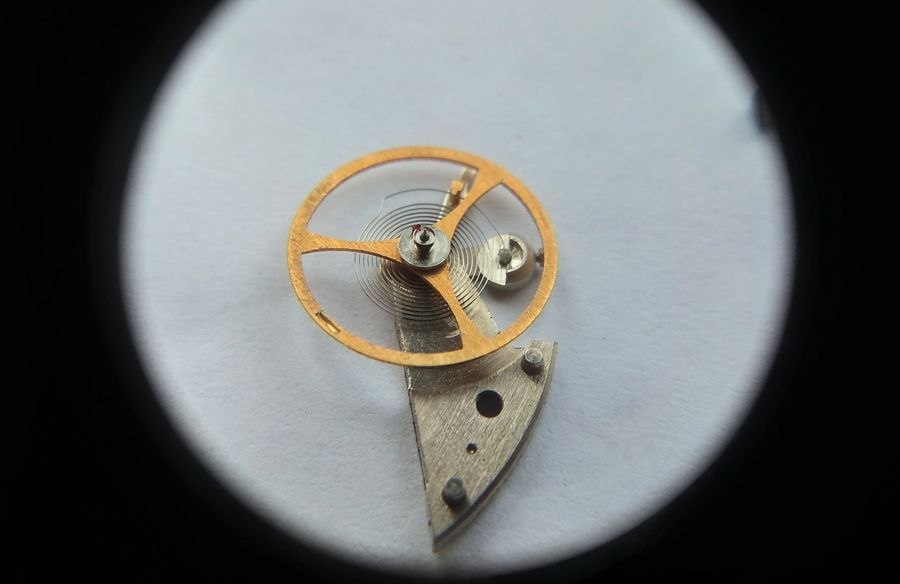
This time I want to give the balance special attention. The first Vostok movements were fitted with magnificent balances. Just look at how the parts are executed — how the heel is formed, how the stud carrier is mounted. This is no clothespin. What follows is simply a few photographs from different angles. Getting ahead of myself, I will say that over two weeks of running the watch needed no correction at all, so stable and accurate is its rate on a balance like this. These are the very Vostok watches people once queued months to buy. I have decided to watch and see how long it takes them to gain or lose a single minute — will a month be enough? When they slip, I will add to the account. For now, let us admire the balance. It is worth it.

Magnified view of the gilt three-arm balance and cock with arrows indicating the heel and stud
The balance under the loupe, the arrows drawing the eye to the heel and the stud carrier. The gilt three-arm wheel and its finely formed fittings are the heart of this caliber's reputation.
Oblique magnified view of the balance cock underside showing the plus-minus regulator and stud carrier
An oblique angle reveals the underside of the cock, the plus-minus regulator index and the solidly engineered stud carrier — nothing flimsy about its execution.
Top-down magnified view of the balance with its flat hairspring and regulator
From above, the clean coils of the hairspring and the regulator pins. This is the assembly that held the watch to within seconds over weeks.
Another angled magnified view of the gilt three-arm balance wheel and hairspring
One more angle on the three-arm balance. The quality on show here is precisely what later, cost-reduced Vostok calibers would quietly leave behind.

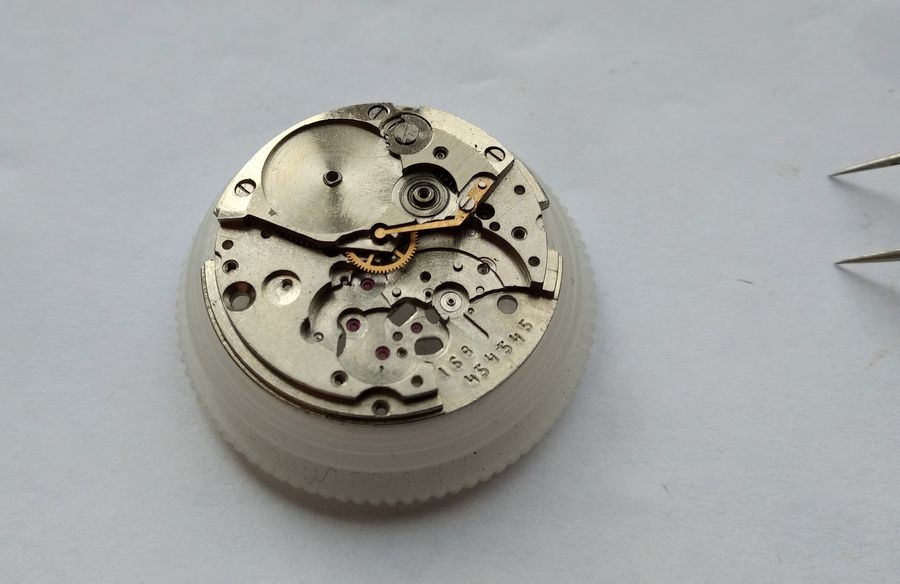
Now the pallet fork. Nothing unusual here.

The pallet fork of the 2428 movement
The pallet fork — entirely conventional, and none the worse for it.

Fork and bridge are in excellent condition. We will rinse them in benzine and lubricate the working faces of the pallet stones.

The pallet fork and its bridge in good condition
Fork and cock both sound. A rinse in benzine, and the impulse faces of the pallet stones will get their oil.

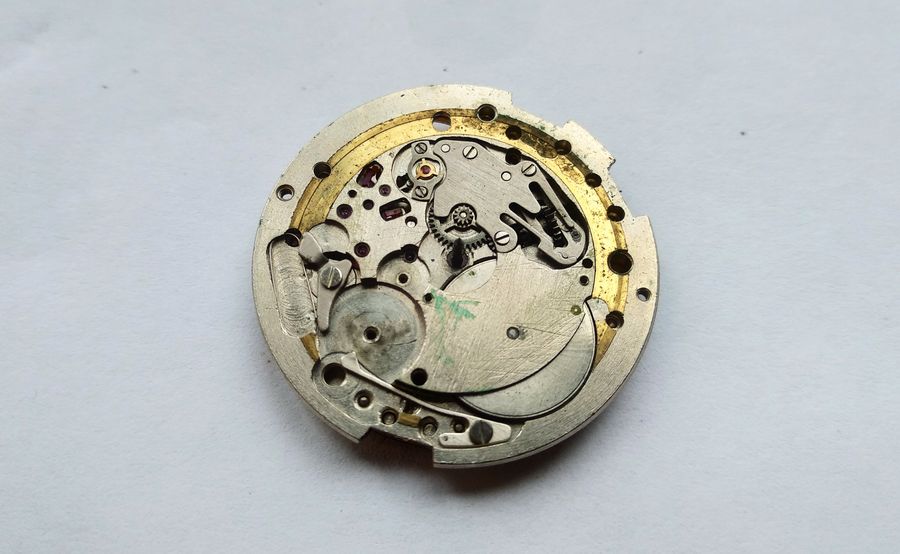
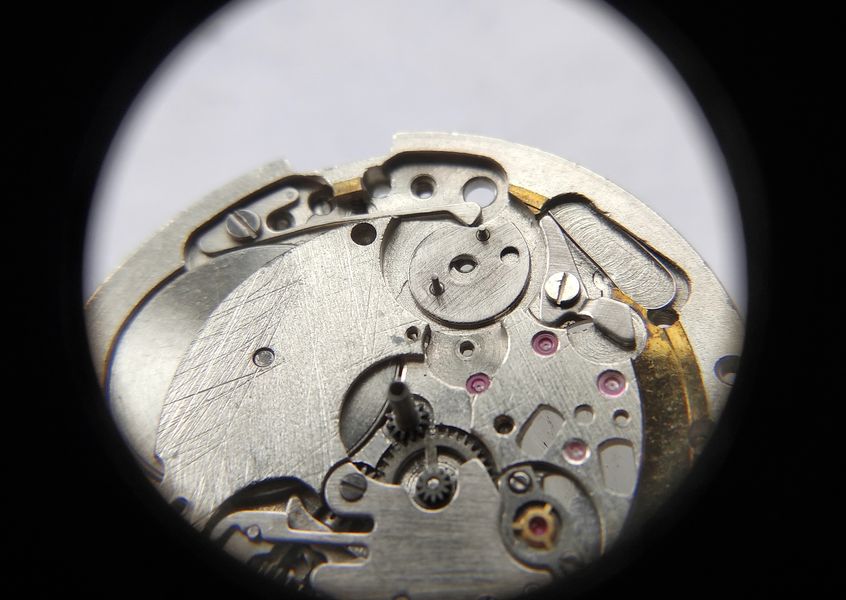
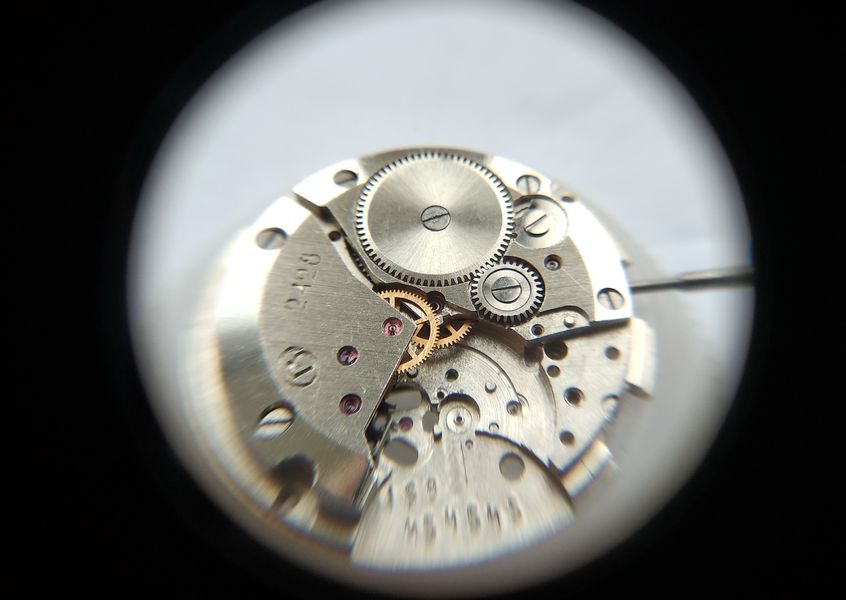
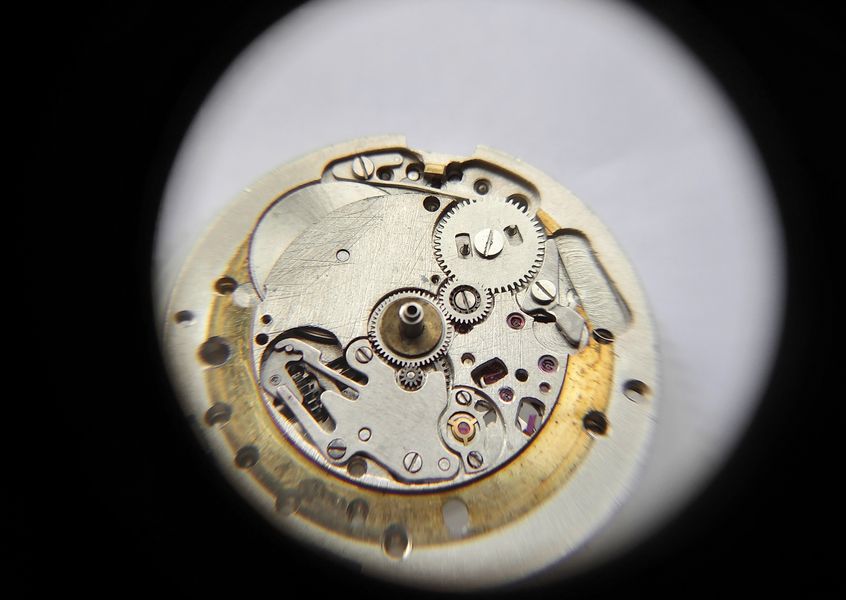
Next, the gear-train bridge.

The gear-train bridge being removed from the movement
The gear-train bridge lifts away to expose the wheels.

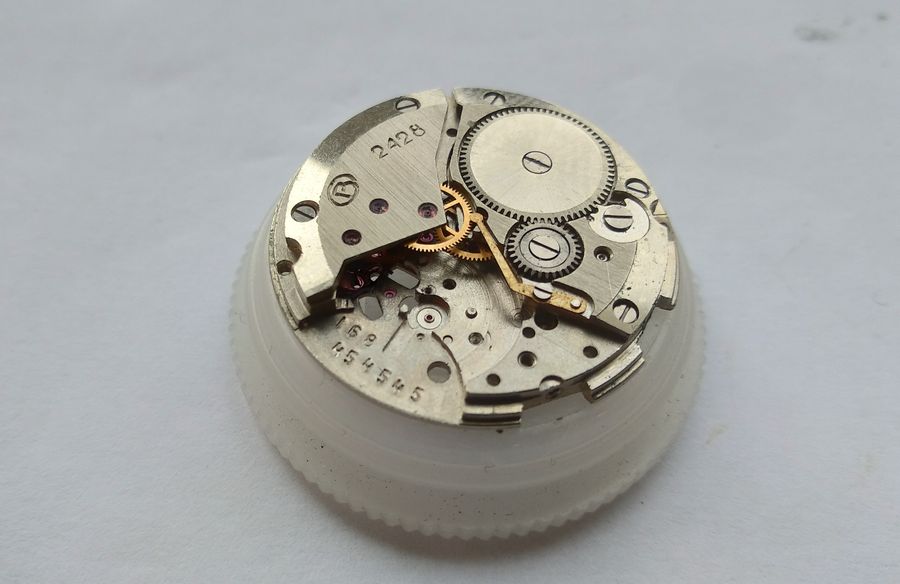
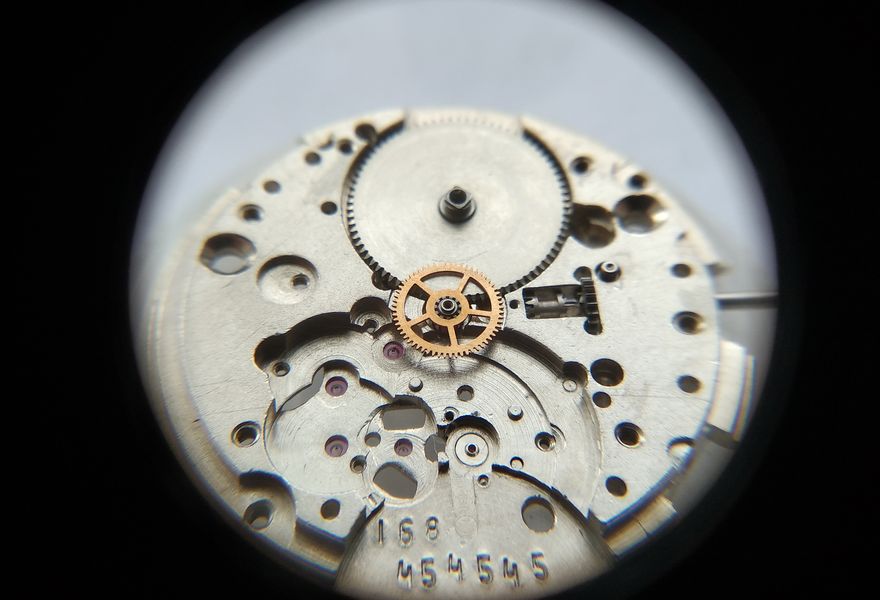
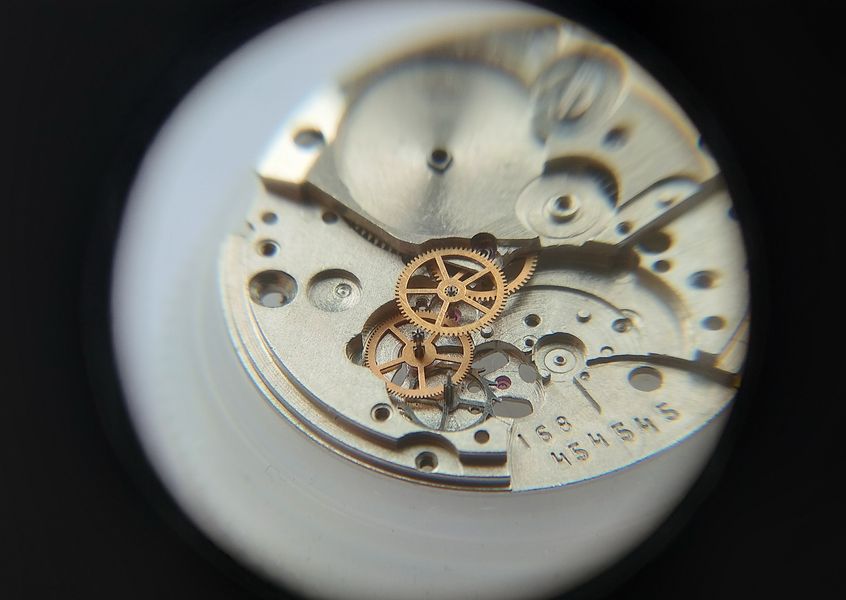
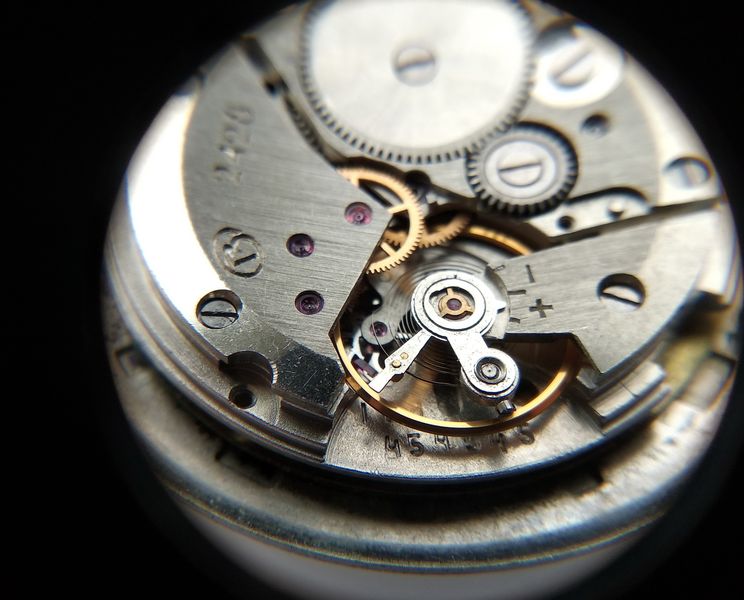
The train is before us. Incidentally, note the movement's serial number. For a number like that alone, the watch deserves a place in a collection.

The going train exposed with the movement serial number visible on the plate
The train laid bare — and a serial number worth a second look stamped across the plate.

We remove the wheels. I will not show them in close-up; the account is long enough as it is. But I will note one characteristic feature: the pivots here are of fairly large diameter compared with other movements, and they are short.

The going-train wheels removed from the plate
The train wheels out. A trait of this caliber: pivots noticeably stouter and shorter than is usual — a deliberate choice for robustness.

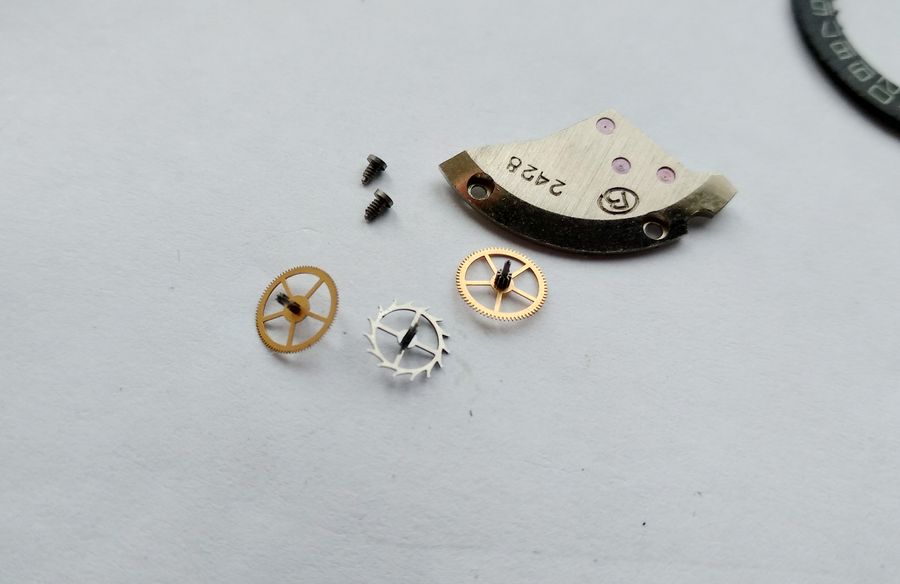
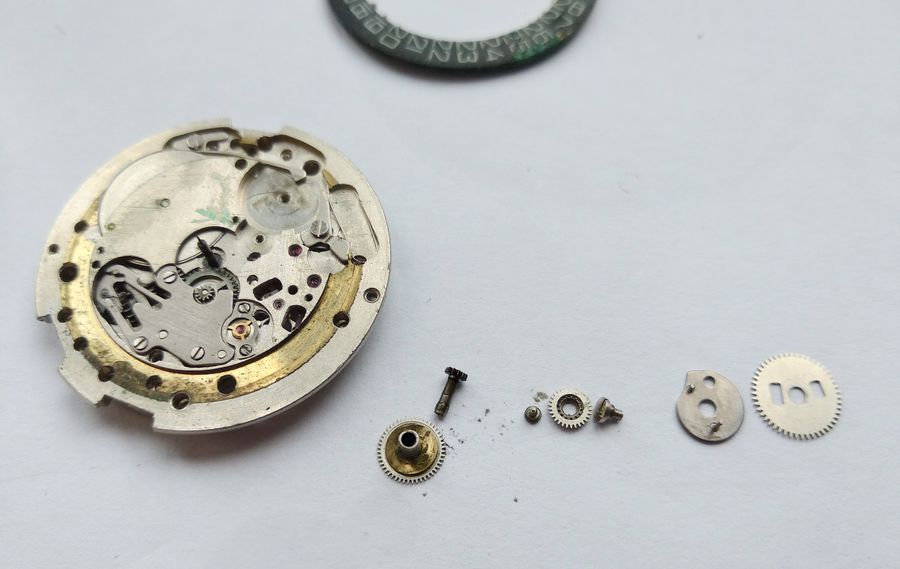
We remove the winding wheels.

Removing the winding wheels from the plate
The winding wheels of the motor come off.

Done.

The movement with the winding wheels removed, serial number visible
The fast side cleared down to the barrel and motor area, the serial number still on show.

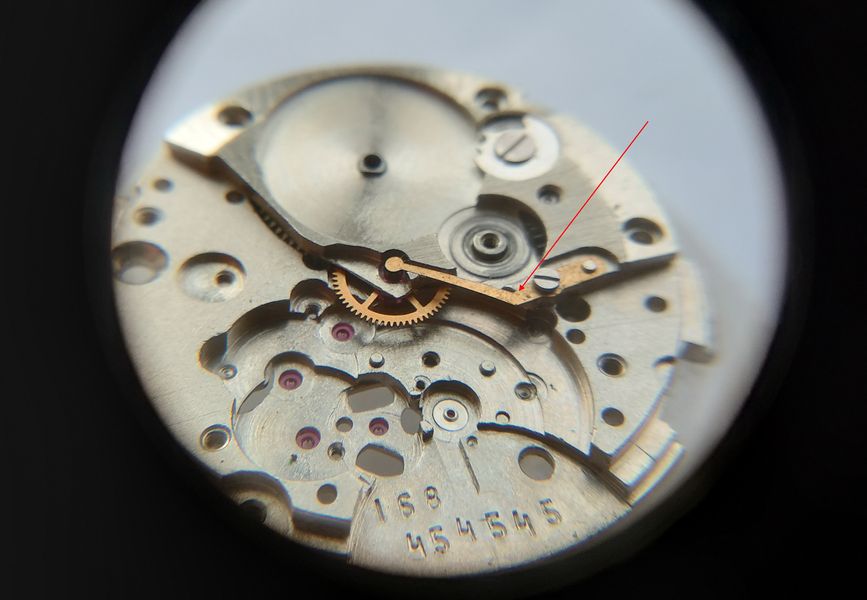
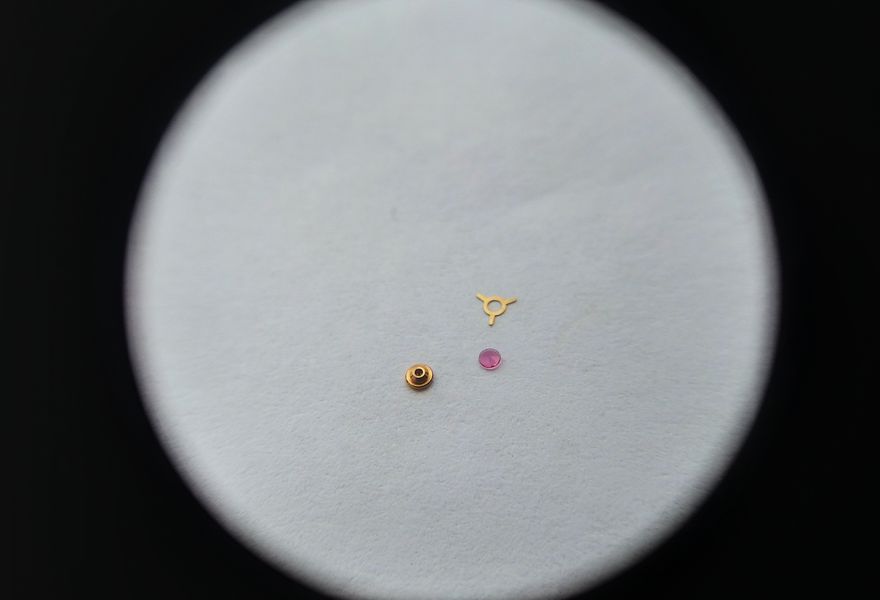
Next comes the chief peculiarity — and the chief shortcoming — of the Vostok 24xx series: the so-called "hook" or "poker." This part supports the seconds pinion with the seconds pin on which the seconds hand is fixed. It is precisely because of this construction that the seconds hand in a Vostok sometimes begins to live a life of its own — now skipping half the dial, now freezing as if rooted. But it is what it is. We remove the "hook" by undoing its retaining screw.

The hook-shaped lever that supports the seconds pinion, before removal
The notorious "hook," the cantilevered lever that carries the indirect seconds pinion. Elegant in theory, it is the reason a Vostok seconds hand can suddenly jump or stall — the caliber's one real design weakness.

Beneath the "hook" sits the seconds pinion.

The seconds pinion exposed under the removed hook lever
With the hook off, the seconds pinion is revealed in its seat.

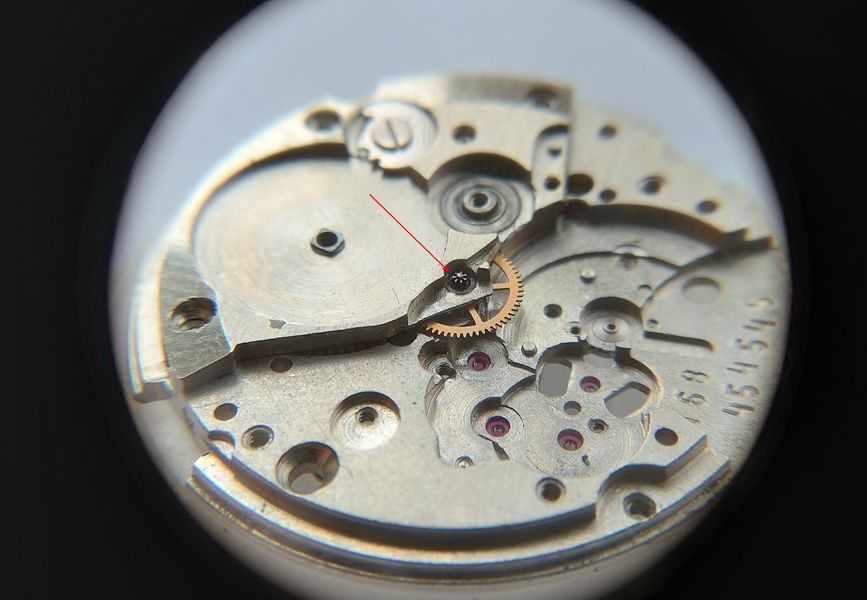
We simply lift it out.

Lifting the seconds pinion from its seat
The seconds pinion comes straight out.

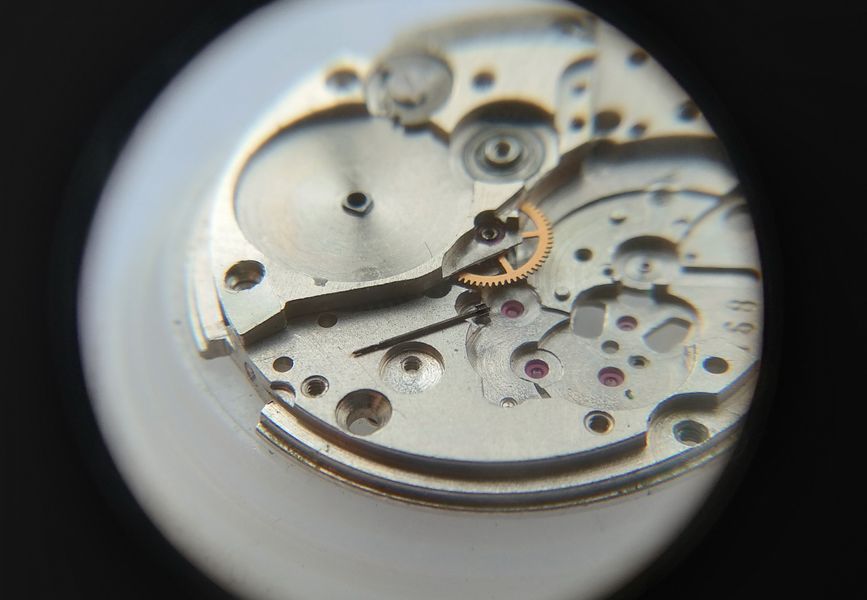
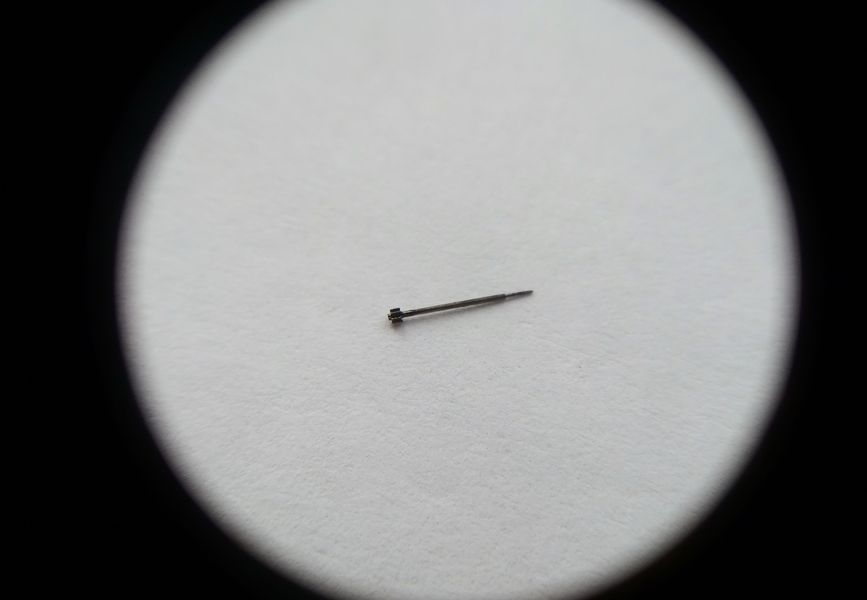
And here it is in person.

The seconds pinion removed and shown on its own
The seconds pinion itself — the small part at the center of the Vostok seconds-hand quirk.

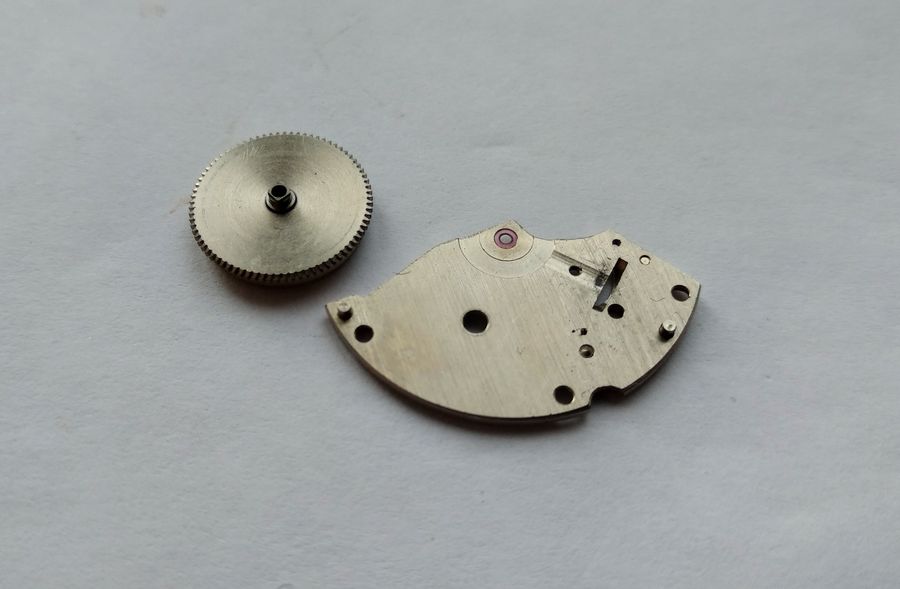
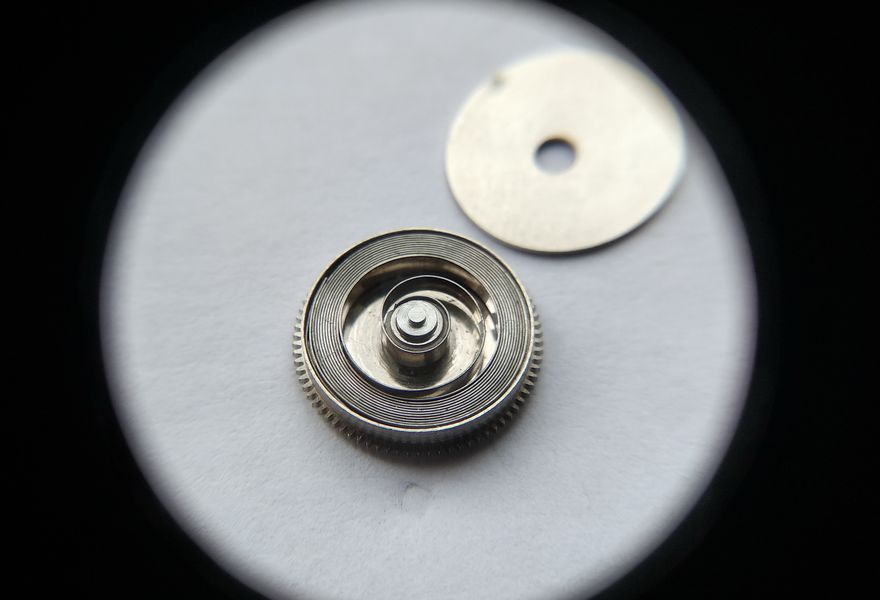
Now to remove the barrel bridge and the barrel.

Removing the barrel bridge and mainspring barrel
The barrel bridge and the mainspring barrel are next off the plate.

Here are those parts.

The barrel bridge and barrel shown removed
Barrel bridge and barrel, set out together.

It remains to lift the center wheel from its jewel. And that is everything on the fast side.

The center wheel being removed from its jewel, completing the fast-side teardown
The center wheel out of its jewel — the train side is now fully stripped.

Keyless Works and the Date Detent

We turn to the keyless works. Off come the spring cover and everything beneath it. I will do this quickly now and show what goes where during reassembly.

The keyless works under their spring cover plate, being disassembled
The keyless works opened up under their spring cover. The detailed layout will be shown on the way back together.

The keyless works are dealt with.

The keyless works fully disassembled
The keyless works fully apart and ready for cleaning.

We dismantle the date-disc detent assembly, removing the lever and the U-shaped spring. The caliber is well made — nothing is lost, nothing scatters.

Disassembling the date-disc detent: lever and U-shaped spring
The date-disc detent — its lever and U-spring — comes apart cleanly, again with nothing flying loose.

The accumulator spring we leave alone. It will wash with the plate.

The accumulator spring left in place on the main plate for cleaning
The accumulator spring stays on the plate — clean enough to wash in situ rather than risk disturbing it.

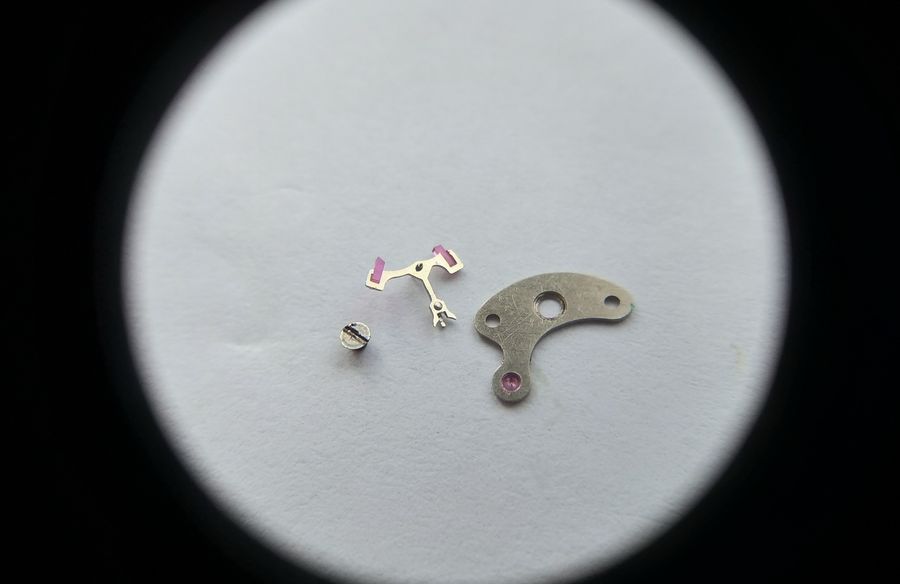
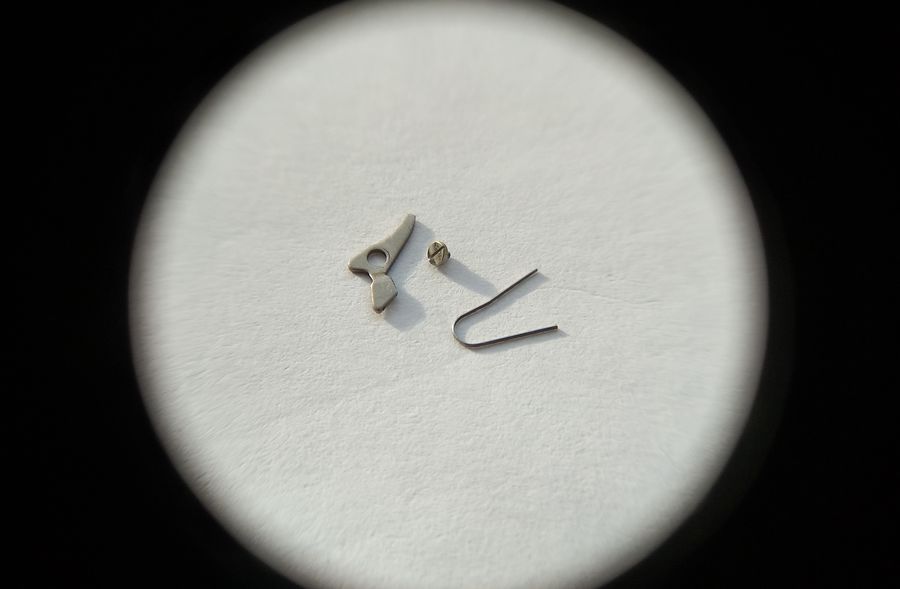
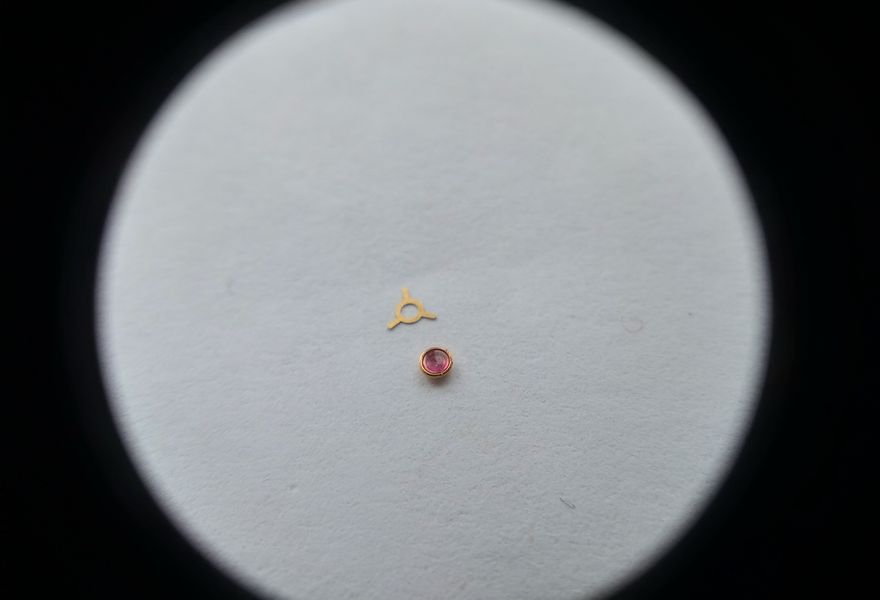
And here are the parts of the date-disc detent. See how simple and dependable it all is.

The disassembled parts of the date-disc detent mechanism
The date detent in pieces — a handful of simple, rugged parts.

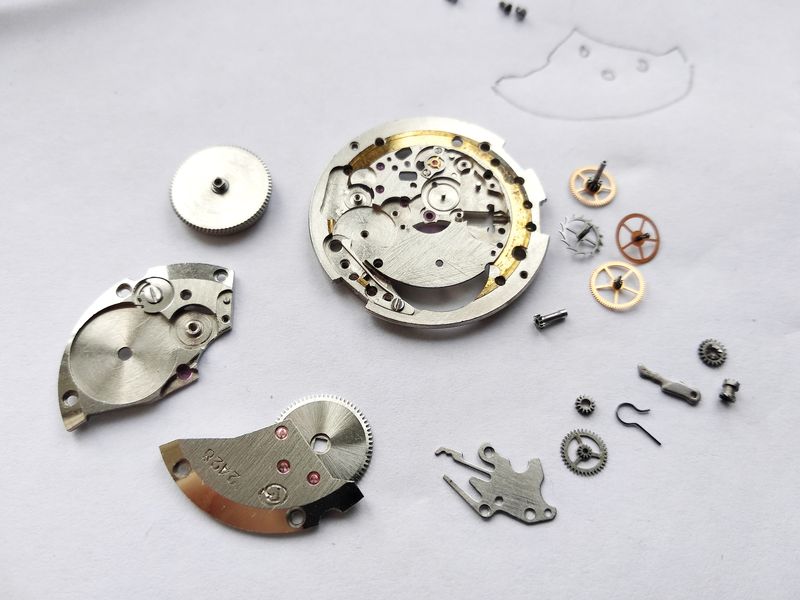
And all of this is in one watch! It seems a small thing, and yet how much it holds inside. That is everything. Time to wash and clean.

All disassembled movement components spread out before cleaning
The complete caliber, reduced to its parts. A surprising amount of mechanism for so compact a watch — and now bound for the cleaning bath.

Cleaning and the Balance Bushing

So, the main plate is washed to a thoroughly respectable state.

The cleaned main plate after washing
The main plate, cleaned and ready to receive the rebuild.

To begin with we will service the balance bushing while everything is still in plain view.

The balance bushing on the plate before servicing
First job on the clean plate: the lower balance bushing, attended to while access is easy.

We take the unit apart, removing the star spring and the bushing.

Removing the star-shaped retaining spring and the balance bushing
The star spring lifts off and the bushing comes free for cleaning.

We drop the bushing into clean benzine, where in due course it obligingly separates into the through-jewel in its chaton and the cap jewel.

The balance bushing separated in benzine into its chaton-set through-jewel and cap jewel
A soak in clean benzine parts the bushing into its through-jewel-in-chaton and the cap jewel above it.

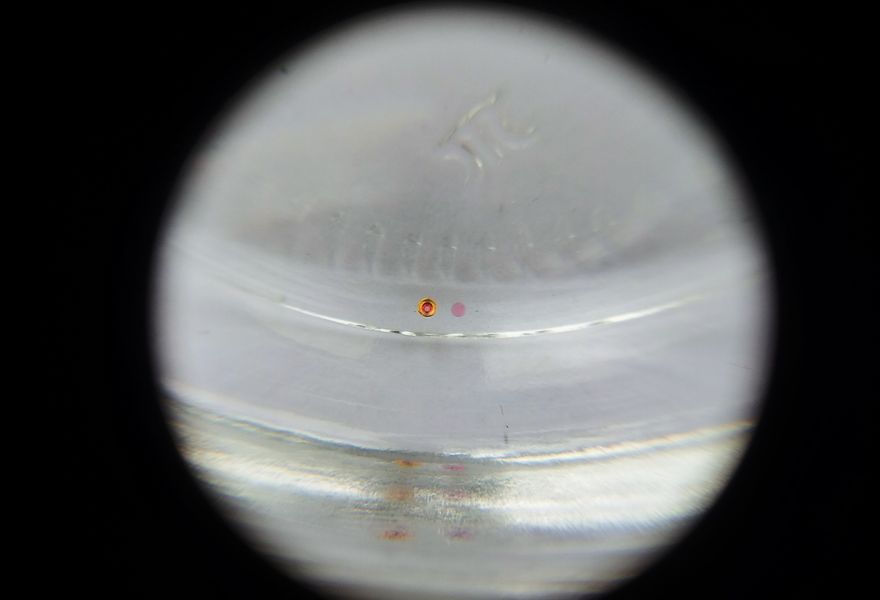
We take the parts from the benzine, dry them, oil the cap jewel with a drop of Moebius 8000 — let us spoil the old fellow — and reassemble the bushing…

Oiling the cap jewel with Moebius 8000 before reassembling the bushing
The cap jewel charged with a drop of Moebius 8000. A fine oil for a movement that has earned it.

… and install it on the plate.

The serviced balance bushing installed back on the main plate
The serviced bushing returns to the plate, ready under its star spring.

There was no reason to take the mainspring apart — it is perfectly clean. I simply washed it in benzine; now we will oil it and assemble the barrel.

The clean mainspring in its barrel ready for lubrication
The mainspring came up clean enough to leave in place — washed, and about to be oiled and closed up.

We prepare the components, gleaming after their wash, for reassembly.

The cleaned movement components arranged for reassembly
The cleaned parts laid out, bright and ready. The rebuild begins.

Rebuilding the Motor and Center Wheel

We start by fitting the sliding clutch and the winding stem.

Fitting the sliding clutch and winding stem to the plate
The sliding clutch and winding stem go in first, establishing the keyless works.

And this is the very "magic button" that, when pressed, releases the winding stem.

The stem-release button shown before installation
The "magic button" — the stem-release detent that made removing the winding stem so painless earlier.

We set it in place.

The stem-release button installed on the plate
The release button seated in its position.

Now a drop of oil into the seat of the barrel arbor. Incidentally, no wear was found either in the seat or in the barrel bridge.

Oiling the seat of the barrel arbor on the plate
Oil to the barrel-arbor seat. Both this bearing and its counterpart in the bridge are free of any measurable wear.

We set the barrel in place.

The mainspring barrel installed on the plate
The barrel goes down onto its oiled seat.

We oil the central jewel and install the center wheel.

Oiling the central jewel and installing the center wheel
The center jewel oiled, the center wheel set into it.

A drop of oil on the center-wheel jewel in the barrel bridge.

Applying oil to the center-wheel jewel in the barrel bridge
The upper center-wheel jewel, carried in the barrel bridge, gets its drop of oil.

And we fit the barrel bridge. That is all here for now. On to the slow side.

The barrel bridge installed over the barrel and center wheel
The barrel bridge in place, the motor side built up. Time to turn back to the calendar side.

Reassembling the Keyless Works and Calendar

We continue assembling the keyless works.

Continuing assembly of the keyless works on the dial side
Back to the keyless works, rebuilding them piece by piece.

We set the intermediate lever onto the release button.

Installing the intermediate setting lever onto the release button
The intermediate lever drops onto the release button that controls it.

Then we return everything else to its place — the setting lever, the R-shaped spring, the setting wheel and the minute wheel.

Installing the setting lever, R-shaped spring, setting wheel and minute wheel
The setting lever, the R-spring, the setting wheel and the minute wheel all go back home.

And we close the keyless works with the spring cover. Honestly, the cannon pinion is best fitted before the minute wheel, so as not to damage the latter by accident. I rushed a little here — but no matter, I know how to manage it without harming the minute wheel.

Closing the keyless works with the spring cover plate
The keyless works closed under their spring plate. A reminder to oneself: seat the cannon pinion before the minute wheel next time.

There. All correct.

The completed keyless works on the dial side
Keyless works done and checked.

We begin assembling the calendar mechanism.

Beginning reassembly of the calendar mechanism
The calendar rebuild starts here.

We install the date-disc detent lever and the U-shaped spring. This is very easy to do here.

Installing the date-disc detent lever and U-shaped spring
The date-disc detent lever and its U-spring go in — an effortless fit, thanks to the sensible design.

Next we set the eccentric with its shifting fingers.

Installing the eccentric with its two shifting fingers
The cammed eccentric, with its tall and short fingers, returns to the plate.

The eccentric wheel.

Installing the eccentric wheel
The eccentric's wheel set into place.

We secure the switching mechanism with a special screw.

Securing the calendar switching mechanism with its special screw
A dedicated screw locks the switching works down.

That is all for now. There is a subtlety here. Do you see this jewel? If everything else were assembled now, it would be very awkward to oil. So we will continue building the calendar system after the going train is in.

A jewel that must be oiled before the rest of the calendar works are assembled
This jewel would be impossible to reach once the calendar is fully built, so the rest of that assembly waits until after the train is in and it can be oiled.

Setting the Train and the Calendar Discs

We turn the plate over and install the train wheels in this order — escape wheel, intermediate wheel, seconds wheel.

Installing the going-train wheels: escape, intermediate and seconds wheels
The train laid in sequence: escape wheel first, then intermediate, then seconds.

We cover the train with the gear-train bridge.

Fitting the gear-train bridge over the wheels
The gear-train bridge caps the wheels.

Now the system of winding wheels can be installed.

Installing the winding wheels of the motor
The winding wheels go back over the barrel.

And after checking the run-down — good! — we install the pallet fork…

Installing the pallet fork after a successful run-down check
The free run-down checks out, so the pallet fork goes in.

… and the pallet bridge, after which, winding the spring a couple of turns, we test the impulse at the fork.

Fitting the pallet bridge and testing the escapement impulse
With the pallet bridge fitted and a couple of turns on the spring, the impulse is checked at the fork — crisp and decisive.

We return to the slow side and oil the train jewels.

Oiling the gear-train jewels from the slow side
From the calendar side, each train jewel — including the awkward one set aside earlier — receives its oil.

Now we install the two-tier wheel and the hour wheel. Then the date disc.

Installing the two-tier wheel, hour wheel and then the date disc
The two-tier wheel and hour wheel go in, followed by the cleaned date disc.

We secure the date disc by fitting the day-disc plate back in place, and check the action of the date-disc switching.

Securing the date disc with the day-disc plate and checking the switching action
Refitting the day-disc plate captures the date disc, and a test confirms the date switches cleanly.

We install the day-of-week disc. Note that the sequence of the days is printed three times over. The designers simply chose not to overthink it — instead of inventing a counting device, they reduced everything to the barest possible minimum. And yet the calendar came out reliable in spite of its simplicity.

Installing the day-of-week disc, its sequence printed three times around
The day-of-week disc, its short sequence repeated three times around the ring. No counting mechanism, no complication — just a clever simplification that works dependably.

The reverse side has been cleaned up to proper condition too.

The reverse side of the movement cleaned to good condition
The other side, likewise brought back to a clean, sound state.

The Balance, the Seconds Pinion, and Casing Up

The balance is next. Superb — I expected nothing less.

The balance ready to be refitted to the movement
The balance, as fine as promised, ready to go back to work.

We service the bushing of the balance cock. Off with the star spring.

Removing the star spring from the balance cock bushing
The upper bushing now: the star spring lifts off the balance cock.

We remove the bushing and service it.

Removing the balance cock bushing for servicing
The cock bushing comes out for the same clean-and-oil treatment as its mate.

Here is the bushing back in place.

The serviced balance cock bushing reinstalled
The serviced bushing returned to the cock.

We secure the bushing with the star spring.

Securing the balance cock bushing with the star spring
The star spring snaps back to lock the bushing — the balance can now be set running.

We install the caliber in its ring.

Installing the caliber back into its carrying ring
The running caliber goes back into the 32 mm ring that makes the full calendar possible.

Done.

The caliber seated in its ring
Caliber and ring united once more.

We install the dial with its map of a virtual world.

Refitting the stained dial to the movement
The dial — that map of an imaginary world — returns to the front of the movement.

We fix the dial.

Securing the dial to the carrying ring
The dial clamped down on its feet.

And now we deal with the seconds pinion.

Preparing to install the seconds pinion
The indirect seconds pinion comes next — the part that demands a careful hand.

We oil the pin and set the part in place. Then we carefully secure the "hook."

Oiling the seconds pin, installing the pinion and securing the hook lever
The seconds pin oiled, the pinion seated, and the hook lever carefully screwed down over it.

There. After the seconds pin is fitted, the hands can go on. If the minute and hour hands give no trouble, the seconds hand here must be handled with great gentleness. We lay the movement on a special support that keeps the seconds pinion from leaving its seat, and only then press the hand onto the pin. In short — we managed it.

Fitting the hands, with the seconds hand pressed on while the movement sits on a support
The hands refitted. The seconds hand calls for special care, pressed on only with the movement resting on a support that prevents the delicate seconds pinion from popping out of its seat.

The movement is finished. So is the case. Here is how the crystal polished up.

The crystal after polishing, now clear
The crystal, polished clear at last — toothpaste vindicated.

Here is the case from inside.

The cleaned interior of the watch case
The case interior, cleaned and ready to receive the movement.

And from outside… well, at this age one can hardly make demands of the looks. Alive, and thank goodness for that.

The exterior of the cleaned but aged watch case
The outside shows its years, as a half-century-old steel case will. Sound and running is what matters.

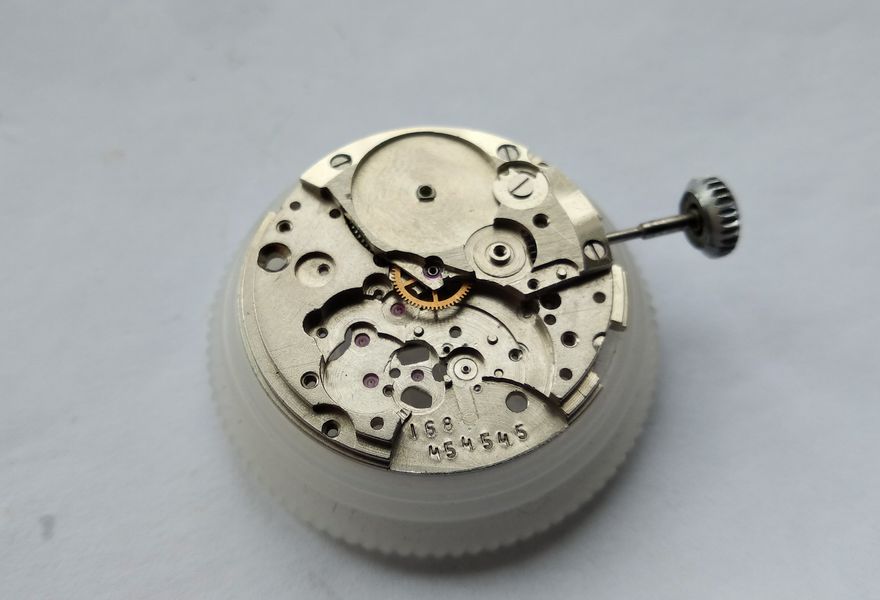
We install the caliber into the case and return the winding stem.

Installing the caliber into the case and refitting the winding stem
The caliber goes home into the case, the winding stem back in its tunnel.

The gasket, having softened in silicone over three days, can be reused. The back gleams. It only remains to sign the inside and add the service date — I jest, of course.

The cleaned case back interior with its reconditioned gasket
Three days in silicone restored the gasket enough to keep it. No need to sign the back — that tradition can rest with the previous owner.

Voilà — the finale.

The fully reassembled Vostok 2428 watch
The finished watch, the discolored dial and all, back in one piece and keeping time.

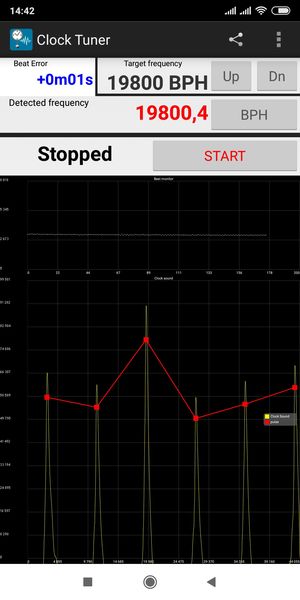
We check the rate. As I said above, for nearly two weeks the watch has run with no perceptible error. Frankly, I am astonished.

Checking the running rate of the serviced watch
Checking the rate. After service the timekeeping is remarkable — the kind of result that explains the queues these watches once commanded.

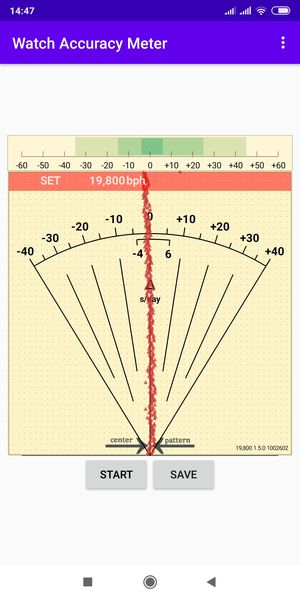
And here is a new little program for checking watch accuracy, called Watch Accuracy Meter. Though, to my mind, the old method is still better.

A smartphone watch-accuracy application measuring the movement's rate
A modern phone app, Watch Accuracy Meter, put to the test — useful, though the trained ear and a long observation still have the final word.

So, to sum up. It is a real pity that Vostok abandoned the 2428, especially with a balance like this one. The watch has two faults: there is no direct quick-set for the calendar, and there is that troublesome seconds mechanism. In everything else — and all the more so considering the years of its active life — it is a thoroughly worthy design, the equal of its international contemporaries, and in the reliability of its calendar switching perhaps one of the best of its period. Servicing it is not even especially difficult, only painstaking; this account ran long for a reason. But after, say, a Slava 2428, it is child's play by comparison. Let them tick. And as a final note: twenty-six days after I set it running, the watch had lost all of thirty seconds. Half a minute in a month. From a Soviet workhorse made before 1980, that is a result worth pausing over.

0
2
4 June, 2026
New
Slava 2428 Mechanical Watch 1980s – Soviet Triple Calendar, 26 Jewels
Sale
-21 %
New
Vintage Slava Soviet Watch USSR Cal 2428 26 Jewels Day Date Navy Dial 1980s
Model: SWS027
Out Of Stock
$85.00 $67.00
Comments0

Write a review

Note: HTML is not translated!
icon_whatsapp icon_mes icon_teleg icon_email icon_viber icon_callback